Growing food indoors during winter is not about novelty, décor, or chasing perfect-looking plants. After decades of off-grid and semi-off-grid living, one thing becomes clear very quickly: indoor growing only matters if it produces usable food consistently. Anything else is entertainment.
This article is written from that mindset. The goal is not to “grow plants,” but to grow meals—greens you can eat daily, herbs you actually use, and supplemental calories that make winter living more resilient and less dependent on external supply chains.
We’ll walk through a six-rack, window-facing grow system designed for winter use, explain how to start seeds properly, how to size plants and containers, and how to choose between soil, hydroponics, and aeroponics depending on experience level. By the end, a reader should be able to reproduce this setup with confidence, even as a beginner.
Soil First: Why Beginners Should Start Here
Before diving into layouts and crops, one point needs to be made clearly: soil is the best starting point for beginners.
Soil is forgiving. It buffers mistakes. It holds nutrients and moisture in a way that buys you time when you over-water, under-water, or miss a feeding. For someone new to indoor growing, soil dramatically reduces failure rate.
Hydroponics and aeroponics absolutely have their place—and we’ll cover them later—but they require:
- tighter monitoring
- cleaner systems
- faster reaction to problems
For a first winter food setup, soil allows you to focus on light, spacing, and harvest rhythm, which matter far more at the beginning.
Part 1: Planning the System Before You Plant Anything
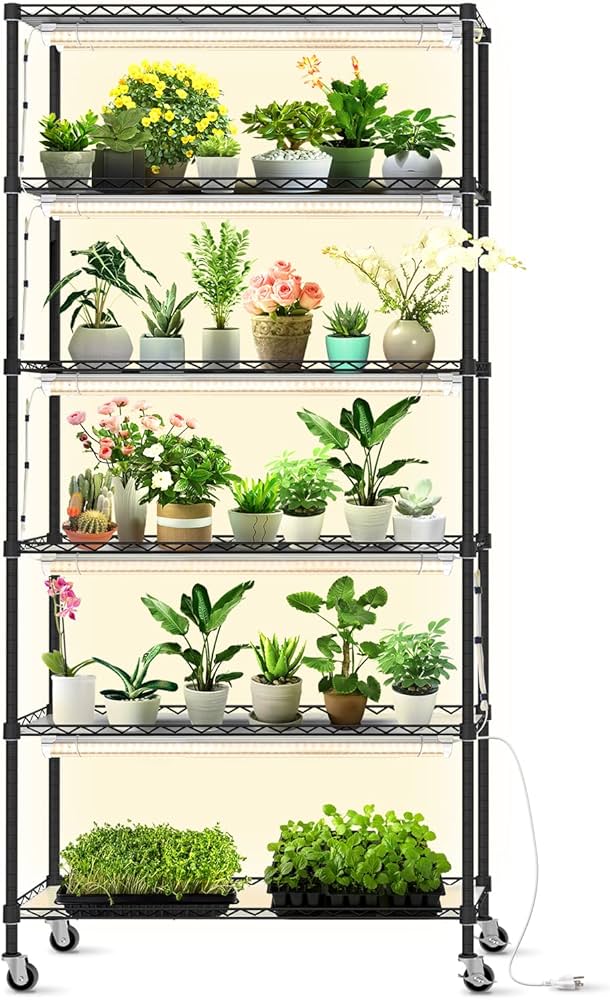
A six-rack system works best when each level has a defined purpose. Random planting leads to overcrowding, uneven light use, and wasted effort.
Assumptions for this setup:
- One heavy-duty 6-tier rack
- Window-facing placement
- Full-spectrum LED grow lights on every shelf
- Adjustable light height
- Good airflow in the room
The racks are organized top to bottom, following heat, humidity, and light needs.
Rack 1 (Top): Seedlings and Microgreens
The top rack functions as both a nursery and a fast-nutrition shelf. Heat rises, and young plants thrive in slightly warmer conditions.
This rack is not about volume—it’s about speed and consistency.
Crops That Belong Here
- Radish microgreens – ready in 7–10 days and extremely high in vitamin C; ideal for winter immune support
- Broccoli microgreens – contain sulforaphane, a compound linked to detox and cellular health
- Pea shoots – high in protein for a green crop and regrow after cutting
- Baby spinach starts – tolerate cool rooms later but need warmth to germinate
- Green onion starts – regrow repeatedly from the same base
These crops require shallow soil and minimal root depth, allowing tight spacing without stress.
Lighting should be bright but close to the canopy—young plants stretch quickly if light is too far away. A consistent 14–16 hour light cycle keeps growth compact and strong.
Rack 2: Culinary Herbs You’ll Actually Use
Herbs earn their own rack not because they feed you directly, but because they make survival food enjoyable. A winter diet without flavor becomes monotonous fast, and morale matters more than people admit.
High-Value Indoor Herbs
- Parsley – thrives in cooler indoor temps and provides vitamin K and iron when fresh greens are scarce
- Chives – regrow endlessly after cutting and replace onion flavor in winter cooking
- Thyme – slow growing but extremely resilient and powerful in small amounts
- Oregano – prefers strong light and drier soil, making it low-maintenance indoors
- Basil (compact varieties) – fast growing, but benefits from frequent pruning to prevent legginess
Each herb does best in its own container. Crowding herbs reduces airflow and increases disease risk indoors.
This rack does not need the strongest light, but it does need consistency. Uneven lighting causes herbs to lean and weaken over time.
Rack 3: Leafy Greens for Daily Eating
This is where indoor growing begins to feel like real food production. Leafy greens are the backbone of winter nutrition indoors.
They grow quickly, tolerate repeated harvesting, and provide bulk to meals.
Reliable Indoor Greens
- Kale (dwarf varieties) – extremely nutrient dense and tolerant of cooler air
- Swiss chard – produces both edible leaves and colorful stems, and regrows aggressively
- Romaine lettuce – more calorie-dense than loose leaf varieties
- Bok choy – matures quickly and works well in stir-fries and soups
- Tatsoi – thrives under lower light and cold windows
Each plant should be grown in 6×6 inch pots, roughly 6–8 inches deep. This size balances root space with shelf efficiency and allows repeated cut-and-come-again harvesting.
Rack 4: Compact Calorie Crops
This rack separates hobby gardening from homesteading. Leafy greens alone won’t sustain you. You need substance.
Indoor calories come from plants that grow compact but produce dense nutrition.
Best Indoor Calorie Contributors
- Dwarf bush beans – fix nitrogen, produce protein, and thrive under strong light
- Peas – can be trellised vertically or sideways along the rack frame
- Beets – provide both edible greens and roots, doubling food output
- Short carrots – varieties bred for shallow containers perform best indoors
Plants here require stronger lighting and slightly deeper soil. This is where maximizing vertical efficiency matters most.
Rack 5: Root Crops and Slow Producers
Root crops are not flashy indoors, but they are reliable winter calories when managed correctly.
They prefer cooler temperatures and tolerate slight drafts near windows.
Strong Indoor Root Options
- Turnips – fast growing and forgiving in container size
- Radishes (larger varieties) – grow quickly and tolerate dense planting
- Beets (second succession) – staggered planting prevents all roots maturing at once
- Garlic greens – not bulbs, but leafy shoots that provide strong flavor
Containers should be 8–12 inches deep. Wider spacing reduces competition and improves root size.
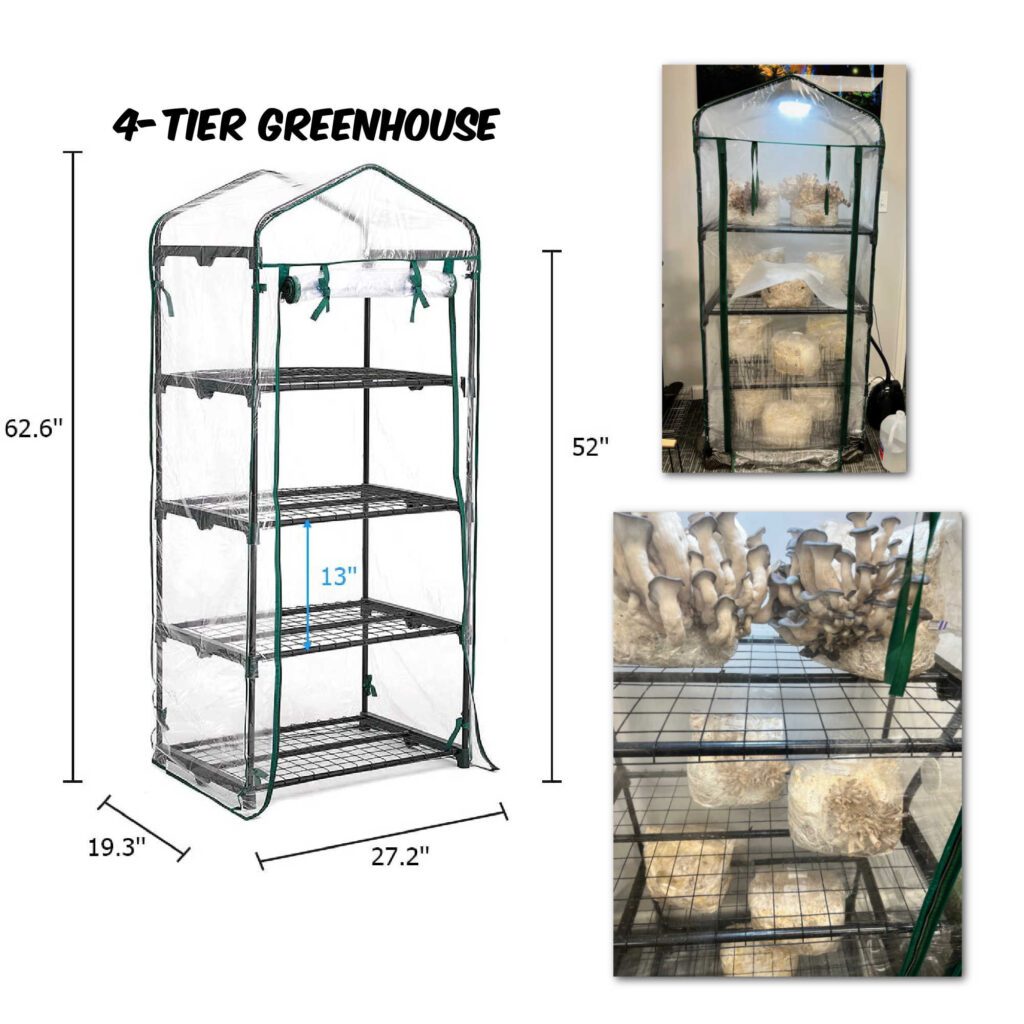
Rack 6 (Bottom): Mushrooms in a Controlled Environment
The bottom rack is ideal for mushrooms because it’s cooler, darker, and easier to control humidity.
Mushrooms add protein, minerals, and depth of flavor that plants cannot replace.
Ideal Indoor Mushrooms
- Oyster mushrooms – fast growing and forgiving for beginners
- Lion’s mane – excellent nutritional profile and medicinal value
- Shiitake – slower, but dense and filling
A simple terrarium bin or humidity tent works well. For beginners, pre-made grow blocks or basic techniques like brown rice flour substrates can be referenced without complexity.
Part 2: Seed Starting, Germination, and Plant Sizing
Indoor success starts before seeds hit soil.
Seeds should be started in small batches, not all at once. Succession planting every 1–2 weeks ensures continuous harvest instead of overwhelming surpluses.
Germination tips:
- Use warm conditions for the first 3–7 days
- Keep soil moist, not wet
- Once sprouted, increase light immediately to prevent stretching
Plant sizing matters indoors. Oversized plants waste energy and space. Compact, productive varieties outperform “garden giants” under artificial light.
Soil vs Hydroponics vs Aeroponics (Pros and Cons)
Soil Growing (Best for Beginners and Long-Term Reliability)
- Buffers mistakes naturally — soil holds nutrients and moisture, meaning if you overwater or underfeed slightly, the plant doesn’t immediately crash the way it can in water-only systems.
- Lower equipment costs — dirt, compost, and basic pots are far cheaper than pumps, reservoirs, tubing, meters, and replacement parts.
- Less daily monitoring — once you recreate a healthy soil environment indoors, biology does much of the work for you without constant adjustment.
- Slower failure when something goes wrong — in soil, a mistake often shows as yellowing or slowed growth; in hydroponics, a nutrient imbalance can kill plants in days or even hours.
Soil is forgiving. That forgiveness is why it’s ideal for learning.
Hydroponics (Higher Yields, Higher Attention)
- Faster growth rates — nutrients are immediately available to roots, which can significantly speed up leafy green production.
- Higher yield per square foot — plants can be packed tighter when roots don’t compete for soil resources.
- Requires precise nutrient management — a slightly off nutrient mix or pH imbalance directly affects roots, with no buffer.
- Failures happen fast — too strong a nutrient solution, pump failure, or warm water can wipe out an entire shelf quickly.
Hydroponics rewards discipline and routine, but punishes neglect.
Aeroponics (Maximum Speed, Minimum Forgiveness)
- Extremely fast growth — roots suspended in air receive maximum oxygen, accelerating plant metabolism.
- Very efficient nutrient use — misted nutrients go directly where the plant needs them.
- Complex systems — clogs, misting failures, or power interruptions are common failure points.
- Least forgiving method — roots dry out quickly if anything fails, making aeroponics unsuitable for beginners or low-attention setups.
Aeroponics is impressive, but best treated as an advanced experiment, not a winter food foundation.
Bottom-Line Advice to Readers
If you’re new to indoor food growing:
Start with soil, master the fundamentals, then experiment upward.
This six-rack system works because it balances:
- biological forgiveness
- space efficiency
- real food output
- manageable workload
Once that foundation is solid, hydroponics can increase output — but soil is what gets most people through their first successful winter.
What Should You Realistically Expect to Grow From This Setup?
One of the biggest mistakes indoor growers make is expecting outdoor yields from indoor space. That mindset leads to disappointment. The correct way to think about this system is consistent supplementation, not total replacement of your food supply.
That said, a well-managed six-rack system like this can absolutely move the needle on winter food security.
Realistic Weekly Output (Once Established)
With proper lighting, spacing, and staggered planting, a six-rack system can reasonably produce:
- Leafy greens:
Enough kale, chard, bok choy, and lettuce for 1–2 large servings per day, every day. This is the backbone of the system. - Herbs:
Continuous fresh herbs for cooking — easily replacing store-bought herbs entirely through winter, with surplus for drying. - Microgreens:
One to two full trays per week, providing dense nutrition that would otherwise be expensive or unavailable in winter. - Root crops:
A slow but steady harvest — radishes weekly, beets and turnips every few weeks — best thought of as meal extenders, not bulk staples. - Mushrooms:
One grow block can produce multiple flushes over several weeks. Realistically, expect 1–2 meals per week supplemented with mushrooms.
What This System Does Not Do
This setup will not replace:
- stored grains
- dried beans
- preserved meat
- root cellar staples
What it does do is:
- drastically improve nutrition
- reduce grocery dependency
- stretch stored food
- provide psychological relief during winter
- keep skills sharp year-round
Think of it as a living pantry, not a farm.
Quick reality check before the table
This kind of rack saves you the most money on high-markup perishables: herbs, salad greens, microgreens, and mushrooms. It saves you less on true staples (rice, pasta, potatoes, dried beans).
For context, “average grocery cost for one person in Canada” is often cited around $297–$400/month (groceries only) depending on location and demographics. Food prices are also expected to rise in 2026 (forecast 4–6% overall).
Simple yield table (6-rack system, soil-based)
Assumptions (reasonable, not fantasy):
- 6-tier rack, good LEDs, 14–16 hrs/day for greens/microgreens
- staggered planting (so you’re harvesting weekly)
- 1 person, “eat this regularly” level (not “feed a family”)
Very important: your results depend more on staggered planting than gear. If you plant everything once, you get one big harvest… then nothing.
| Rack | What you grow | Realistic weekly yield | Store value (CAD) | Store value (USD) | What this replaces |
|---|---|---|---|---|---|
| 1 | Microgreens (radish, broccoli, pea shoots) | 2–6 oz (60–170 g) | $8–$20 | $6–$15 | Premium microgreen clamshells |
| 2 | Herbs (parsley, chives, basil, oregano, thyme) | 2–6 bunch equivalents | $4–$20 | $3–$15 | Fresh herb bundles & packs |
| 3 | Leafy greens (kale, chard, romaine, bok choy, tatsoi) | 6–14 servings | $10–$25 | $7–$19 | Bagged salads + bunch greens |
| 4 | Compact “substance” crops (peas, beans, beet greens) | 1–3 servings | $3–$10 | $2–$7 | Supplemental protein/veg sides |
| 5 | Roots (radish, baby beets, turnips, carrots) | 1–4 servings | $2–$8 | $1–$6 | Fresh winter root vegetables |
| 6 | Mushrooms (oyster, lion’s mane) | 0.25–1.0 lb | $5–$18 | $4–$13 | Specialty mushrooms |
Monthly Savings Summary (Single Person)
| Usage level | Monthly savings (CAD) | Monthly savings (USD) | Notes |
|---|---|---|---|
| Conservative | $25–$60 | $18–$45 | Herbs + some greens |
| Realistic | $60–$140 | $45–$105 | Regular greens, herbs, mushrooms |
| Dialed-in | $140–$250 | $105–$185 | Most greens replaced, mushrooms weekly |
So what does it save a single person?
To estimate savings, we tie your yields to the stuff people actually buy in winter:
- herbs (often overpriced)
- salad greens and cooking greens
- mushrooms
- microgreens (optional, but a big “value per shelf” item)
A practical monthly savings range (CAD)
Conservative (you use it casually): $25–$60/month
Realistic (you eat greens/herbs often): $60–$140/month
Dialed-in (you replace most greens + some mushrooms weekly): $140–$250/month
Those ranges line up with current produce pricing examples like $1.97 kale bunches and $1.97 parsley bunches, while other herbs can be noticeably higher depending on retailer/package size.
What % of a typical grocery bill is that?
If someone spends roughly $297–$400/month on groceries, then:
- $60/month saved ≈ 15–20%
- $140/month saved ≈ 35–47%
- $250/month saved ≈ 62–84% (this is only if you truly replace a lot of bought produce)
Final Thoughts from a Long-Time Homesteader
An indoor grow rack is not a decoration—it’s winter infrastructure.
Start with soil. Learn the plants. Understand light and spacing. Only then experiment with hydroponics or aeroponics.
If you can grow food in January, when everything outside is frozen solid, you are already more resilient than most people realize.
And that’s the point.
For tips on beginner small game hunting CLICK HERE