
Air Layering Fruit Trees: Can You Really Grow a New Tree From a Branch?
I recently came across one of those short gardening videos that immediately makes you stop scrolling. A branch on a fruit tree was wounded while it was still attached to the tree, a container of water was placed around the damaged section, and eventually roots began growing from the branch. The implication was almost absurdly simple: instead of starting another fruit tree from seed, why not convince part of the tree you already have to grow its own roots?
At first glance, it looks like exactly the sort of gardening trick that works perfectly in a 30-second video and nowhere else. Except the basic idea is very real. It is a form of plant propagation called air layering, also known as marcotting, pot layering, and historically Chinese layering, and variations of the technique have been used for a very long time. Purdue Extension notes that air layering was used by the Chinese centuries ago, while modern horticultural guides still teach essentially the same underlying process today.
What really caught my attention was not simply the possibility of producing another tree. Fruit trees are expensive. Depending on the size and variety, buying several decent young trees from a nursery can turn the dream of a backyard orchard into a fairly serious investment, so the idea of turning one established fruit tree into several more for the cost of some moss, plastic, pots, and patience is incredibly appealing.
There is a catch, though. Air layering is not a magic cloning button, different fruit trees respond very differently, and that water-bottle version circulating online is not necessarily the method I would trust with every branch. But once you understand what is happening inside the branch, how to choose the right wood, and when to separate the new plant, this becomes an experiment that an ordinary backyard gardener can realistically try.
What Is Air Layering?
Air layering is essentially rooting a branch before cutting it off the tree. Instead of taking a cutting and asking a leaf-covered stick with no roots to somehow survive long enough to grow them, you leave the branch connected to the mature parent plant while encouraging roots to form at one specific point. The parent tree continues supplying water to the branch during the process, which is one reason layering can be much more forgiving than simply cutting off a branch and sticking it into soil.
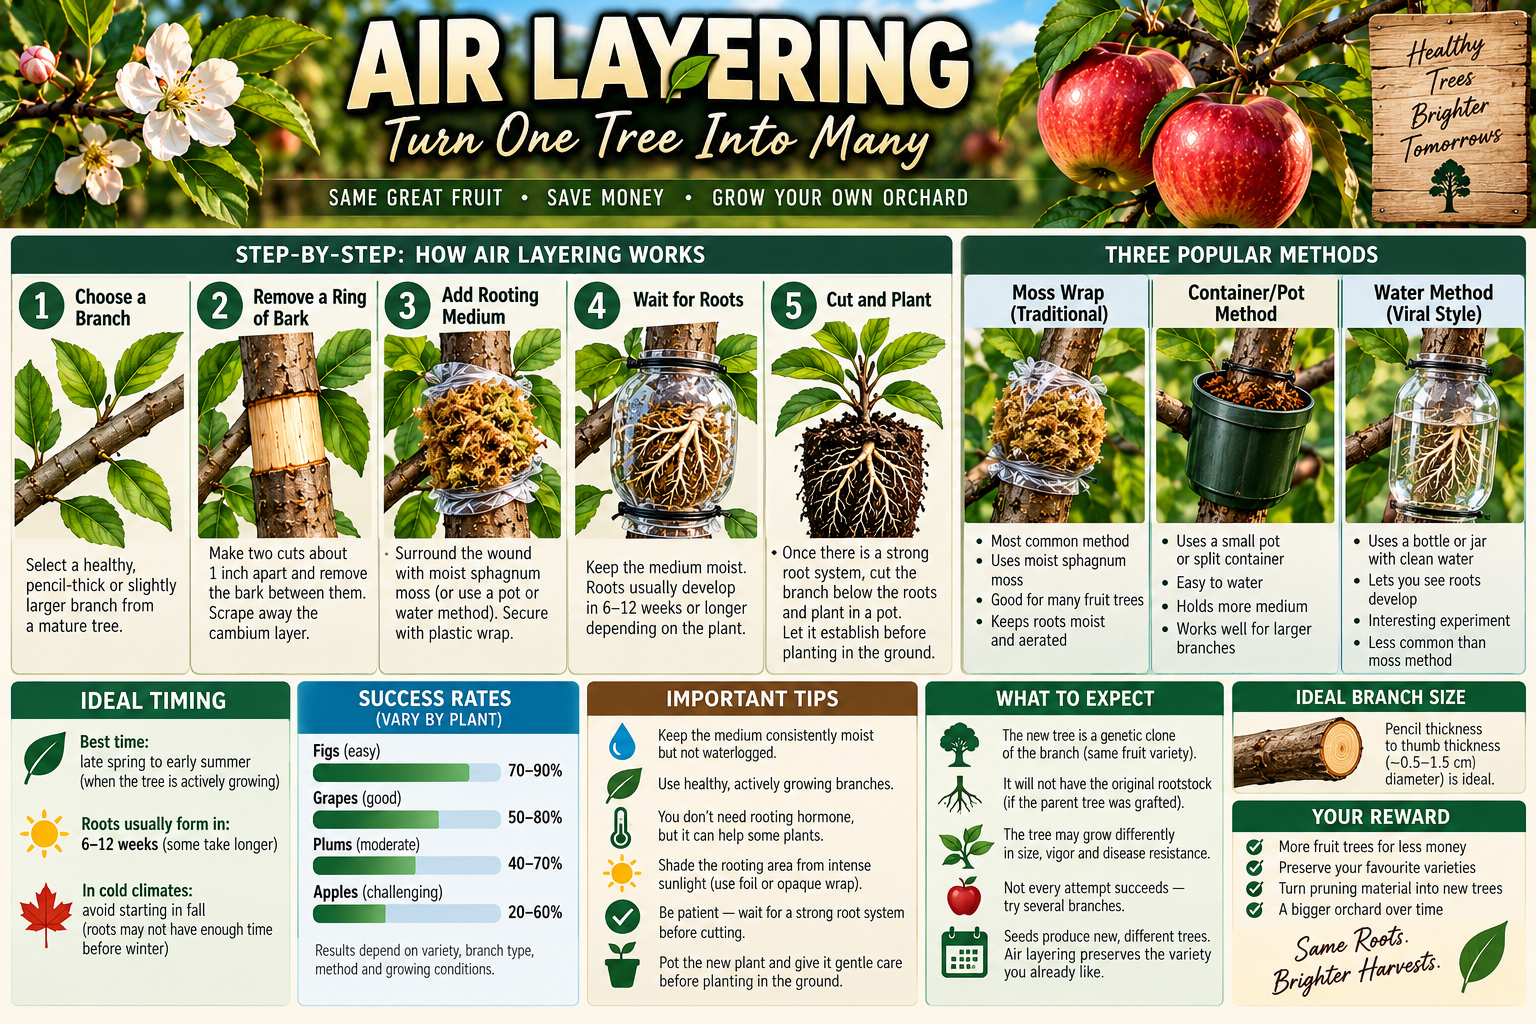
The classic method is surprisingly simple. A ring of bark is removed from a healthy branch, the exposed area is surrounded with moist sphagnum moss or another suitable rooting medium, and everything is wrapped so the material stays damp. Once that rooting medium becomes filled with roots, the branch can be cut below the new root system and planted as an independent plant.
That is the basic method, but gardeners have come up with plenty of variations. Instead of wrapping a handful of sphagnum moss directly around the branch, you can use a split flowerpot, a modified plastic bottle, a commercial air-layering ball, or another small container filled with moist growing medium. Then there is the intriguing water method, where the wounded section is kept in water rather than surrounded by moss or soil.
All of those techniques are trying to accomplish the same thing: keep a living branch attached to its parent while creating conditions that encourage roots to form at the wounded section.

Why Air Layering Is Different From Growing a Fruit Tree From Seed
If you eat an excellent apple, save the seed, plant it, and grow a tree, you have not really cloned that apple tree. Sexual reproduction mixes genetic material, so the seedling is a new genetic individual. The resulting fruit could eventually be excellent, terrible, or simply completely different from the apple that inspired you to plant the seed in the first place.
Air layering is vegetative propagation. The new plant comes directly from the living tissue of the original branch, so the variety itself is preserved. If you successfully air-layer a branch from a particular apple cultivar, you are growing that cultivar rather than rolling the genetic dice with a seedling.
That distinction becomes extremely important if you are trying to build a home orchard around fruit you already know you like. Growing from seed can still be fascinating, and I think it is absolutely worth doing as an experiment, but air layering is attempting something different. You are not asking, “What will this seed become?” You are asking, “Can I make another plant from this exact tree?”
There is also something satisfying about using an established tree as your propagation stock. A mature tree may have dozens of small branches that will eventually be pruned anyway. If even a handful of those branches can become healthy independent trees, the economics of slowly building an orchard begin to look very different.
Why Wounding the Branch Can Make Roots Grow
A tree branch is not just a solid piece of wood carrying water from one end to the other. Different tissues inside and underneath the bark move water, sugars, hormones, and other materials through the plant. Air layering deliberately interferes with some of those pathways without completely cutting off the branch from the parent tree.
With the traditional technique, a narrow ring of bark is removed and the cambial tissue is scraped away so the wound does not simply reconnect and heal. Water can still move upward through the woody tissues, while the disruption encourages conditions around the upper part of the wound that can favour adventitious root formation. The wounded area is then surrounded with a moist, aerated environment where those developing roots have somewhere to grow.
This is also why I would not simply snap a branch because a viral video makes that look easy. A controlled wound gives you a far more predictable situation than partially breaking the branch and hoping you happened to damage exactly the right tissues. The goal is to stress the branch in a very specific way while keeping it alive and functional.
And that word aerated matters. Established propagation guidance emphasizes a rooting medium that holds moisture while still allowing air around the developing roots. That is one reason I consider the water-bottle approach an interesting experiment rather than automatically assuming it is superior to the traditional method.
Three Air-Layering Methods Worth Trying
Traditional Sphagnum Moss Air Layering
If I wanted the best starting point for my first attempt, this is the method I would use on most of my branches. Choose healthy, actively growing wood roughly pencil thickness or somewhat larger, rather than sacrificing a major structural limb. Purdue Extension likewise recommends pencil-sized or slightly larger shoots for conventional air layering.
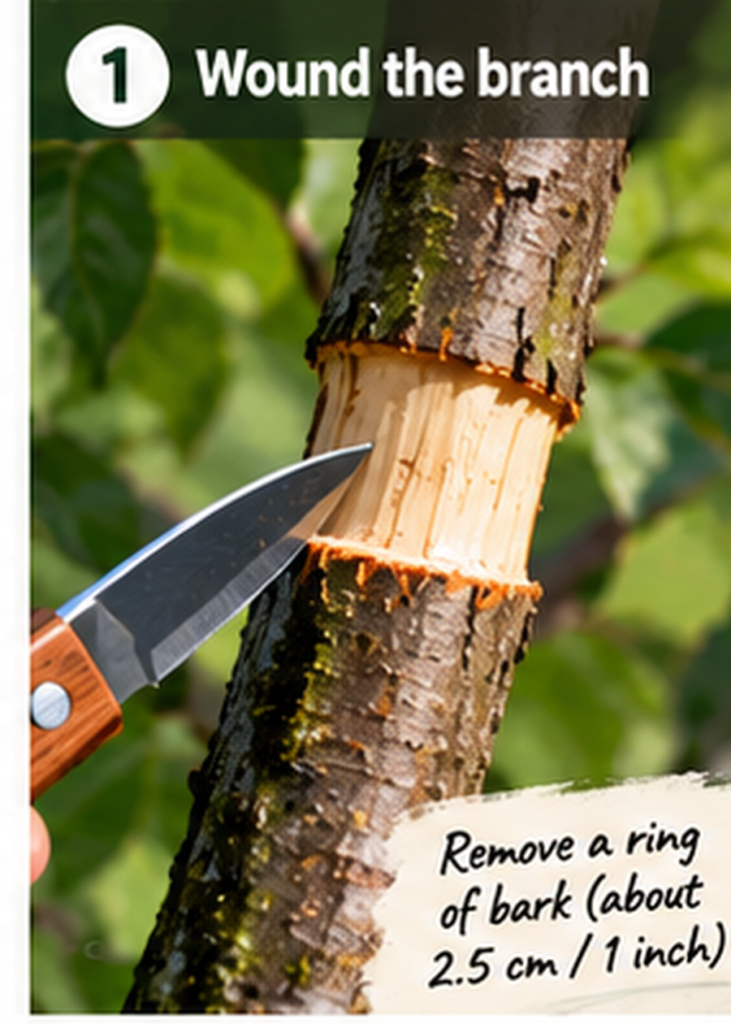
Make two shallow cuts around the branch, roughly an inch apart, and connect them with a vertical cut. Carefully peel away the band of bark between those cuts and gently scrape the exposed surface to remove the remaining cambial tissue. You are trying to create a clean girdled section without cutting deeply into the wood itself.
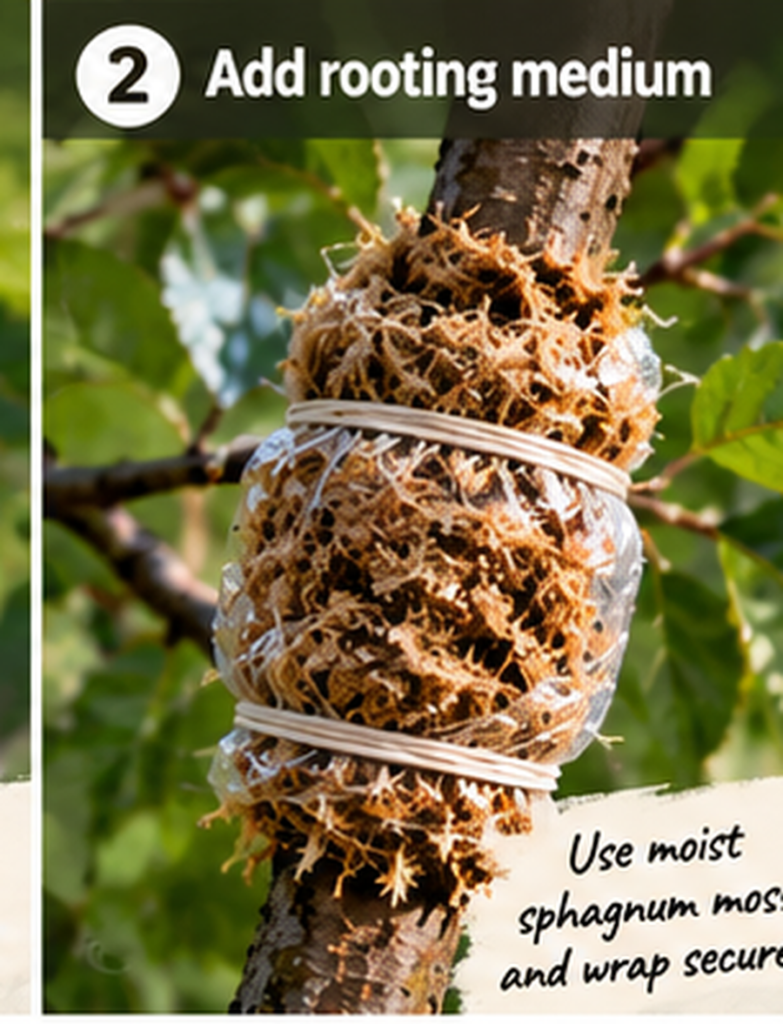
Next, soak sphagnum moss in water and squeeze it so it is thoroughly damp without pouring water everywhere. Pack a generous amount around the wound, wrap it securely with plastic, and tie or tape both ends so the moss does not dry out. An opaque outer layer such as foil can help shield the rooting area from intense sunlight while still allowing you to remove the cover later and inspect what is happening.
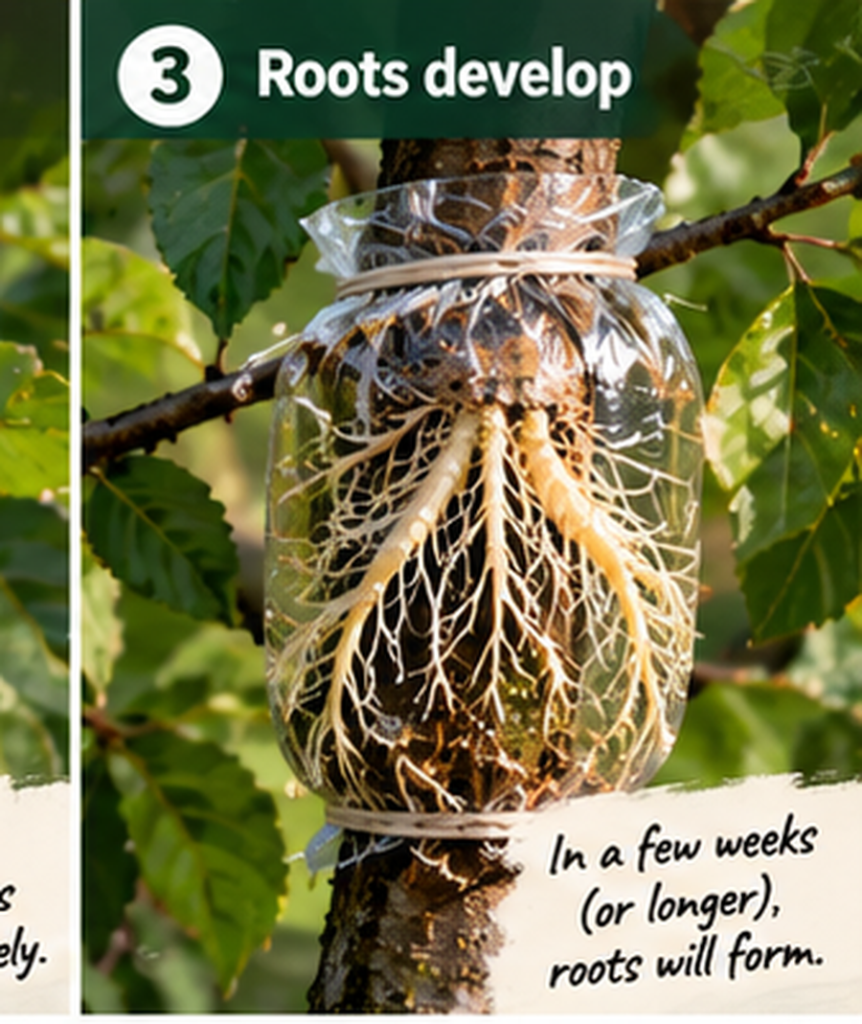
Then you wait. Do not dismantle the entire thing every few days because curiosity gets the better of you. Check periodically for moisture and, once sufficient time has passed, look for roots spreading throughout the moss.
Container or Pot Air Layering
The container method operates on nearly the same principle, but instead of squeezing a ball of moss directly around the branch, you enclose the wound inside a small container filled with rooting medium. A plastic pot can be cut and fitted around the branch, or a bottle can be modified so that the branch passes through it. Commercial air-layering pods are basically a more polished version of the same idea.
This method appeals to me because it is easy to experiment with. You can use a larger quantity of rooting medium, support the container independently if necessary, and potentially make watering easier. There are even documented own-root apple experiments using pots or bags of growing medium around branches rather than the classic small moss ball.
The downside is weight and heat. A big container full of wet soil hanging from a small branch can become surprisingly heavy, especially in wind, and a clear plastic bottle exposed to strong summer sun can heat up far beyond the surrounding air temperature. Keep the setup reasonably small, support it when necessary, and shade the rooting container without shading all the leaves that are still powering the branch.
Water Air Layering
This is the version that originally grabbed my attention. Instead of packing the wounded section with moist moss or potting medium, a bottle or jar is positioned so the damaged portion of the branch remains in water while the rest of the branch stays attached to the tree. If roots emerge, you can potentially watch them develop through the transparent container.
I would absolutely try it — but I would not make it my only method. Traditional horticultural air layering normally relies on moist but aerated rooting media, so a permanently submerged wound is meaningfully different from the conventional approach. Rather than treating the viral water method as a proven upgrade, I would treat it as one side of a backyard comparison experiment.
For example, if I were air-layering five branches next spring, I might use the traditional moss method on three and the water method on two. Label them, photograph them, record when roots first appear, and compare the root systems when the experiment is finished. If water wins, great; if sphagnum wins, you have still hopefully produced several new trees.
Can You Air Layer an Apple Tree?
Yes, apple trees can produce roots through air layering, although apples are not something I would describe as a guaranteed beginner plant. Published horticultural research has successfully produced own-root apple plants through air layering and has also shown that rooting response can depend heavily on the cultivar and treatment used.
That variability is important. You might see spectacular root growth on one tree and disappointing results on another even though you followed nearly identical steps. Fruit-tree propagation is biological rather than mechanical; you are creating favourable conditions, not issuing the plant a command.
That said, if you already own a healthy mature apple tree, the cost of experimenting can be tiny. Choose several modest branches that you would not be devastated to lose, preferably spread around the canopy rather than clustered on one limb. You do not need to attack the tree’s major scaffold branches to find out whether your variety wants to root.
And if you are dreaming about turning one apple tree into the beginnings of an orchard, this is where things become genuinely exciting. Even a 50-percent success rate from a few carefully selected branches each year could eventually produce quite a collection of trees without repeatedly buying nursery stock.
The Important Catch With Apples: Rootstock
There is one major detail that should be understood before anybody starts imagining rows of identical apple trees. Most nursery-grown apple trees are grafted. The apple variety that produces the fruit is attached to a separate rootstock selected for characteristics such as tree size, vigour, anchorage, disease response, soil suitability, and how quickly the tree begins cropping.
Ontario’s apple-production guidance makes the role of rootstock very clear: different rootstocks can produce anything from strongly dwarfed trees to nearly full-sized trees, and their characteristics influence much more than just height.
If you air-layer a branch above the graft union, the new tree does not magically reproduce that rootstock. It is growing on roots produced by the fruiting variety itself. You have created what is commonly called an own-root tree.
That means an air-layered branch from a dwarf nursery apple does not necessarily become another dwarf tree. Its ultimate size, anchorage, vigour, winter performance, disease susceptibility, and time to productive cropping may be different because the original rootstock is gone. For a backyard experiment, I find that more fascinating than discouraging, but it is something you should understand before planting five air-layered trees six feet apart and discovering that they have very different ideas about their mature size.
For more information on why this matters, Ontario maintains an excellent guide to apple rootstocks and their characteristics.
What You Need for a Basic Air-Layering Experiment
You do not need much specialized equipment to try this. In fact, most of the materials are inexpensive enough that the real investment is patience rather than money.
For the traditional method, gather:
- A sharp, clean knife or pruning blade
- Moist sphagnum moss
- Clear plastic wrap or a sturdy plastic bag
- Tape, twist ties, or cable ties
- Aluminum foil or another light-blocking outer cover
- Clean pruning shears for eventual separation
- Optional rooting hormone labelled for woody plants
- Labels and a permanent marker
- A few suitable nursery pots and well-draining potting mix for later
Rooting hormone can help some difficult woody plants, but I would not treat it as mandatory magic. NC State’s propagation guidance notes that rooting hormone is not always necessary, while research on apple air layering has shown that hormone treatment can influence results in some cultivars.
The labels may actually be one of the most useful things on the list. If you are comparing methods, write down the date, branch, method, and whether rooting hormone was used. Three months later, “I think this was the one with hormone” is not particularly useful experimental data.
When Should You Start?
In a climate with a real freezing winter, I would start in late spring or early summer, once the tree is actively growing. Purdue notes that air layers are commonly made in spring on the previous season’s growth, with late-summer layering also possible in some situations.
For cold climates, I prefer the earlier window because it gives you options. If you start around late May or June and the branch takes eight, ten, twelve, or more weeks to develop a useful root system, you still have summer remaining. If you wait until September, every delay pushes you closer to dormancy, frost, and frozen soil.
Do not become obsessed with a promised number of weeks, either. Some guides and successful growers report visible roots in roughly two months, while other apple layers can take much longer. Even historical and experimental own-root apple work makes it clear that rooting is not uniformly easy.
The better rule is simple: start early enough to give the tree time, then let the roots decide when you cut.
How Do You Know When the Branch Is Ready?
This may be the most important judgment in the entire process. Two tiny white root tips are exciting, but they do not automatically mean the branch is ready to become an independent tree. The moment you cut that branch away, its new roots inherit responsibility for supplying every leaf above them.
Wait until you have a substantial network of roots spreading through the rooting medium. NC State specifically recommends allowing the rooting medium to fill with roots before severing the new plant from its parent.
A clear wrapper can make inspection easier, although an opaque outer cover should still protect the root zone from direct sunlight. Once you think the layer is ready, inspect it carefully without ripping apart the moss and damaging the very roots you are trying to evaluate.
If you find yourself staring at three weak roots and asking, “Is this enough?” my instinct would be to wait. Another week attached to a mature tree is generally a much safer position than one week too early sitting in a pot with an inadequate root system.
Cutting the New Tree Free
Once the root mass is genuinely developed, use clean pruning shears or a pruning saw appropriate for the branch and cut below the rooted section. Support the branch with your other hand so its weight does not snap downward and tear through the newly formed roots while you are making the cut.
Carefully remove plastic, foil, bottle sections, or other materials without pulling the root ball apart. Do not wash every scrap of moss away just because you want to see the roots more clearly. New roots are tender, and this is not the time to satisfy your curiosity by handling them excessively.
Move the new tree into a well-draining pot that is large enough for the root system but not absurdly oversized. Water thoroughly, protect it from severe wind and scorching afternoon sun while it adjusts, and keep the soil consistently moist without keeping it permanently saturated. Extension guidance recommends giving newly separated air layers some extra care until their root systems become better developed.
Over the following weeks, gradually expose the tree to more normal conditions. You have gone from a branch supported by an established tree with a massive underground root system to a small plant surviving on a brand-new handful of roots. That transition deserves a little respect.
Should You Pot It or Plant It Straight Into the Ground?
I would generally pot the newly separated tree first. That gives you better control over watering, wind exposure, shade, and the overall transition while the new root system adjusts. You can also move the pot if extreme weather arrives.
If the air layer was started early and separated during summer, the tree may have enough time to establish strongly before fall. At that point, planting it into its permanent location can make sense, particularly in a cold climate where leaving a small root ball exposed in an above-ground pot all winter can be harder on it than having those roots insulated by surrounding soil.
Do not force the calendar, though. A weakly rooted layer should not be severed simply because August has arrived and that was the date written in your original plan. The condition of the plant matters more than your schedule.
If your climate has cold winters, also remember that apples are naturally deciduous trees. They are supposed to go dormant. The goal is not necessarily to bring an apple tree into your heated living room and convince it that winter has been cancelled.
A Five-Branch Backyard Experiment
If you have a healthy established tree, I think five small air layers would make a fantastic experiment. It gives you enough attempts to learn something without taking an unreasonable amount of growth from a large tree.
I would set it up something like this:
- Branch 1: traditional sphagnum moss, no rooting hormone
- Branch 2: traditional sphagnum moss with rooting hormone
- Branch 3: container method with moist potting medium or sphagnum
- Branch 4: water-bottle method
- Branch 5: second water-bottle attempt or another conventional layer as a control
Try to choose branches of roughly similar age and thickness so the comparison means something. Record the starting date, photograph each setup, and inspect them on a consistent schedule rather than constantly disturbing whichever one happens to be easiest to reach.
At the end of the season, compare more than whether roots existed. Which method rooted first? Which produced the densest root mass? Which stayed moist with the least maintenance? Which new tree handled separation best? Most importantly, which ones are still alive the following spring?
That final measurement is the one I care about. Producing roots for a photograph is nice; producing a tree that survives winter and resumes growth the following year is success.
Could Air Layering Actually Help Build a Cheap Home Orchard?
This is what makes the technique much more interesting to me than another clever gardening trick. I would love to be able to look across a property years from now and see rows of apple, plum, pear, or other fruit trees without having spent thousands of dollars buying every tree at retail prices. Air layering cannot provide every tree in every situation, but it could become one tool for gradually expanding an orchard.
The trade-off is obvious: money versus time. A nursery has already done years of propagation, grafting, growing, pruning, transporting, and caring for the tree before you buy it. When you propagate your own, you save much of that purchase cost by taking responsibility for those years yourself.
You also accept more uncertainty. A professionally produced grafted apple tree comes with a known rootstock and much more predictable mature characteristics. An own-root air-layered apple is partly an experiment, especially if you do not know how that particular cultivar behaves on its own roots.
That does not make the experiment pointless. It simply means a smart home orchard would probably combine approaches: buy certain known grafted varieties and rootstocks when their characteristics matter, propagate some plants yourself, grow the occasional seedling just to see what happens, and gradually learn which methods perform best on your property.
What the Viral Videos Usually Leave Out
The satisfying part of an air-layering video is always the reveal. Someone opens a bottle or unwraps a plastic ball and suddenly an enormous white root system appears. What you usually do not see are the branches that dried out, healed over instead of rooting, rotted inside the package, broke in the wind, or produced weak roots and then died after separation.
That is why a few realities are worth remembering:
- Different species and cultivars can have dramatically different rooting ability.
- Bigger branches are not automatically better; a small root system has to support everything above it.
- Moist does not mean waterlogged when you are using conventional rooting media.
- A few visible roots are not the same as a mature enough root system for separation.
- Starting too late can leave a cold-climate gardener racing against dormancy.
- Air-layering a grafted apple copies the fruiting variety, not the rootstock.
- Even a successfully rooted plant can fail after separation if it dries out or is exposed too quickly to harsh conditions.
- Several attempts are better than putting all your expectations into one branch.
None of that makes air layering a bad technique. Quite the opposite. Understanding why attempts fail is what turns a gardening stunt into an actual propagation skill.
For a solid technical foundation before trying it yourself, the NC State Extension guide to plant propagation and air layering is worth reading.
Is the Water-Bottle Method Actually Worth Trying?
Yes — I think it is worth trying. I just would not build my entire propagation plan around it until I had tested it on the species and cultivar I wanted to reproduce.
That distinction matters. The water method is visually impressive and incredibly easy to understand, but traditional air layering has the advantage of a moist and aerated rooting zone, which is what established horticultural guidance normally recommends.
If I had one irreplaceable branch, I would choose the established moss method. If I had a mature apple tree with plenty of branches and wanted to learn something, I would absolutely put water air layering head-to-head with the conventional technique and let the tree tell me which one works better.
Gardening gets much more interesting when you stop asking the internet which method is “the best” and start running careful little experiments of your own.
Final Verdict: Air Layering Is Real, Useful, and Worth Experimenting With
Air layering sounds almost too convenient: wound a branch, encourage it to produce roots while it remains attached to the tree, cut it off later, and grow another plant. Yet the underlying technique is well established, has been used for generations, and can produce genuinely independent trees and shrubs.
What I would reject is the idea that every dramatic social-media version should be accepted without question. Apples can be difficult to root, water air layering is less conventional than moist-medium layering, and an own-root apple tree is not the same thing as the grafted nursery tree that supplied the branch. Those complications are precisely why this makes such an interesting backyard experiment.
If you want to try it, start with a healthy established tree, choose several expendable small branches, begin in late spring or early summer, and use a proven sphagnum method on at least some of them. Keep the rooting zone moist, give the process time, wait for a substantial root system before cutting, and treat the newly separated tree gently while it establishes.
Maybe three branches fail. Maybe two survive. Maybe five years from now one of those branches is a substantial fruit tree growing on the other side of your property.
And when a decent fruit tree from a nursery can represent a meaningful investment, turning a branch you already own into another living tree starts to feel like a pretty worthwhile experiment.