
How to Preserve Your Garden Harvest: 7 Safe Methods for Food That Lasts
A productive garden creates one of the best problems a household can have: too much food arriving at once.
Cucumbers can go from a few small vines to a daily harvest. Tomatoes begin ripening in clusters. Beans, peppers, zucchini, carrots, beets, herbs, onions, and greens all seem to reach their best stage at the same time. Eating fresh from the garden is great, but without a preservation plan, a large share of that harvest can spoil before you have a chance to use it.
Food preservation is what turns a few busy weeks of summer into meals that still matter in late fall and winter. It can mean jars of pickles in the pantry, frozen peppers ready for chili, dried herbs for soups, fermented carrots in the fridge, or properly cured onions and squash stored for months. The point is not to master every preservation method immediately. The point is to choose the right method for the crop, use safe practices, and gradually build a system that helps your garden feed you longer.
Quick Answer: Match the Method to the Harvest
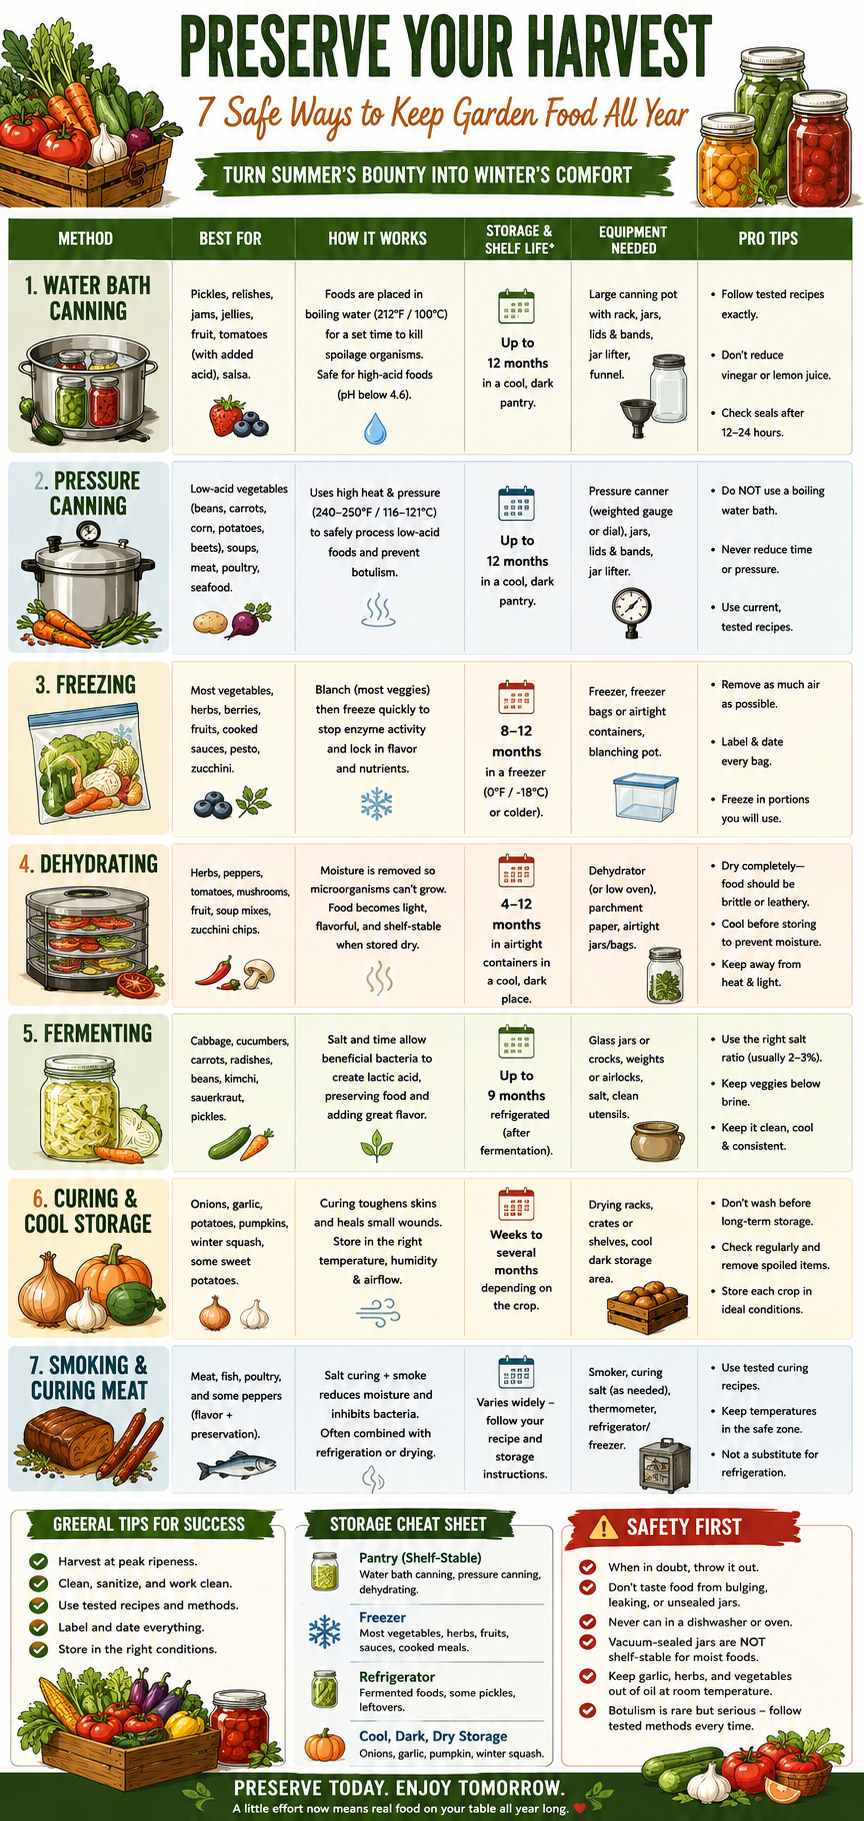
Different foods need different preservation methods. Acid level, moisture content, storage temperature, and the type of food all matter.
| Preservation method | Best for | Typical quality window |
|---|---|---|
| Water-bath canning | Pickles, jams, fruit, tested tomato recipes | Up to 1 year |
| Pressure canning | Plain vegetables, soups, meat, poultry | Up to 1 year |
| Freezing | Most vegetables, herbs, berries, sauces | 8–12 months |
| Dehydrating | Herbs, peppers, tomatoes, fruit, soup mixes | 4–12 months |
| Fermenting | Cabbage, cucumbers, carrots, radishes | Up to 9 months refrigerated |
| Curing and cool storage | Onions, garlic, potatoes, pumpkins, winter squash | Weeks to several months |
| Smoking and curing meat | Meat, fish, poultry | Recipe- and storage-specific |
These are quality guidelines, not guarantees. Storage conditions, preparation, packaging, and the specific crop all matter. Home-canned foods are generally best used within one year, frozen fruits and vegetables commonly hold good quality for about eight to 12 months, and dried foods may last from roughly four months to one year when kept cool, dark, dry, and properly packaged.
Start With the Question: Pantry, Freezer, or Cold Storage?
Before preserving anything, decide what kind of storage you actually have.
A pantry method is useful when freezer space is limited or when you want food ready during a power outage. Water-bath canning and pressure canning create shelf-stable jars when done with current, tested procedures. Drying also produces shelf-stable food, but only after moisture has been removed thoroughly and the product is packaged to prevent it from absorbing humidity again.
Freezing is often the easiest place to begin. It requires less specialized equipment, preserves the fresh taste of many vegetables well, and is forgiving compared with canning. The trade-off is that it depends on freezer space and reliable power.
Curing and cool storage are the low-tech options. They are ideal for crops such as onions, garlic, some potatoes, pumpkins, and winter squash. The key is not putting everything in the same place. Potatoes prefer cool and humid conditions, while cured onions and garlic need dry airflow. Winter squash needs a cool, dry spot and occasional inspection for soft areas or rot.
Water-Bath Canning: Pickles, Jams, Fruit, and Acidified Tomatoes
Water-bath canning is often the first canning method gardeners learn because it is ideal for popular harvest foods such as pickles, relish, jams, jellies, fruit preserves, and properly acidified tomato products. The filled jars are processed in boiling water, which works because the food is naturally acidic or has been safely acidified with ingredients such as vinegar or bottled lemon juice.
Health Canada classifies foods with a pH below 4.6 as high-acid foods. These can be processed with a boiling-water canner because the acidity prevents botulism bacteria from growing while the heat handles many yeasts, moulds, and other spoilage organisms. Pickles, sauerkraut, fruit, jams, jellies, and tomatoes with added acid are common examples.
This is the right method for a garden overflowing with cucumbers. Dill pickles, bread-and-butter pickles, cucumber relish, pickled beans, pickled beets, and pickled carrots can all turn a short summer harvest into pantry food. The important word is tested. Vinegar strength, ingredient proportions, jar size, headspace, and processing time all affect safety.
Tomatoes deserve extra caution. They are often treated casually as a high-acid food, but Health Canada describes them as borderline high-acid. Tomatoes intended for water-bath canning need acid added according to a tested recipe. A tomato sauce containing meat, vegetables, or other low-acid ingredients is not automatically safe for water-bath canning simply because it contains tomatoes.
Pressure Canning: The Method for Low-Acid Vegetables
Pressure canning is the serious pantry-preservation method for low-acid foods. This includes plain vegetables such as carrots, green beans, corn, potatoes, and plain beets, along with soups, meat, poultry, seafood, and mixed meals containing low-acid ingredients.
It is worth being precise with the terminology: this is pressure canning, not simply pressure cooking. A purpose-built pressure canner reaches temperatures that boiling-water canning cannot. Those higher temperatures are necessary for low-acid foods because boiling water is not enough to reliably control the botulism risk associated with improperly processed low-acid foods.
Pressure canning becomes especially useful when a garden produces more beans, carrots, corn, potatoes, or beets than freezer space can handle. It can also be practical for shelf-stable soups, broths, and meal components, but these should come from research-tested recipes. A family recipe may taste excellent, but it may not have been developed for safe heat penetration, jar size, ingredient density, or processing time.
Do not change the pressure level, processing time, jar size, or ingredient amounts in a tested canning recipe. Health Canada specifically warns that substitutions can interfere with safe processing and that home canners should use current tested recipes, proper jars, new self-sealing lids, and the correct headspace.
Freezing the Harvest: The Best Beginner Method
For many gardeners, freezing is the smartest first preservation skill.
It is fast, flexible, and works well for a long list of garden crops. Peppers, tomatoes, beans, corn, peas, berries, herbs, zucchini, carrots, spinach, kale, and homemade sauces can all be frozen. It is especially useful when you have a sudden surplus and do not have time to set up a full canning session.
Most vegetables should be blanched before freezing. Blanching means briefly exposing vegetables to boiling water or steam, then quickly cooling them in ice water. This slows enzyme activity that can damage flavour, colour, texture, and quality during freezer storage. Peppers, onions, leeks, and green onions are common exceptions that do not need blanching before preservation.
A few practical freezing ideas include:
- Freeze chopped peppers in flat freezer bags for chili, stir-fries, and omelettes.
- Freeze whole tomatoes for future sauce, soup, or salsa cooking.
- Freeze blanched beans, peas, corn, carrots, and spinach in meal-sized bags.
- Freeze chopped herbs in water or oil in ice-cube trays.
- Freeze shredded zucchini for baking, soups, and fritters.
- Freeze pesto, tomato sauce, or roasted vegetable puree in small portions.
Frozen fruits and vegetables typically keep their best quality for about eight to 12 months when packaged properly and stored at or below 0°F, or about -18°C. Food may remain safe longer, but texture, colour, and flavour gradually decline.
Dehydrating: A Compact Way to Store Herbs, Peppers, and Tomatoes
Dehydrating removes moisture from food so that microorganisms cannot grow easily. It is one of the oldest preservation methods, but modern electric dehydrators make it much more reliable than trying to dry food outdoors in unpredictable weather.
Drying is excellent for herbs, hot peppers, sliced tomatoes, mushrooms, apple rings, berries, garlic powder, soup vegetables, and lightweight camping food. It is also a good fit for gardeners who do not have much freezer space. A few trays of basil or peppers can shrink down to jars that take up almost no room.
Herbs are one of the easiest wins. Basil, oregano, parsley, thyme, mint, dill, and sage can be dried and stored for winter cooking. Hot peppers can be dried whole or sliced, then crushed into flakes or ground into powder. Tomatoes can become dried slices for sauces, pasta, sandwiches, and soups.
Dried food must be genuinely dry before storage. Vegetables should generally be brittle or crisp, while fruit is often leathery rather than brittle. Store dried food in small airtight containers or sealed bags in a cool, dark, dry location. Dried foods commonly keep four to 12 months, though vegetables usually have a shorter quality window than dried fruit.
Fermenting Vegetables: Turning Surplus Into Flavour
Fermentation is one of the most interesting ways to preserve garden vegetables because it does more than extend storage. It changes the flavour, texture, and acidity of the food.
The basic idea is controlled lactic-acid fermentation. Salt, temperature, time, and proper submersion create conditions where beneficial bacteria produce acid and preserve the vegetables. Sauerkraut, fermented dill pickles, kimchi-style cabbage, fermented carrots, fermented radishes, and fermented green beans all fall into this category.
Fermented pickles are not the same as quick refrigerator pickles. Quick pickles use vinegar for acidity and are usually refrigerated or water-bath canned according to a tested recipe. Fermented pickles build acidity through microbial activity over time. Regular fermented dill pickles and sauerkraut often cure for roughly three weeks, while refrigerator dills may ferment for around one week.
Fermentation is rewarding, but do not wing it. Use tested salt ratios, clean equipment, good-quality water, and a reliable recipe. Once fermentation is complete, refrigerated fermented vegetables can keep for up to nine months according to University of Minnesota Extension guidance.
Curing and Cool Storage: The Low-Tech Winter Pantry
Some crops preserve best when you do almost nothing to them.
Curing allows a crop’s outer skin to toughen, dry, or heal slightly before storage. This is especially useful for onions, garlic, pumpkins, and winter squash. It is not the same as drying food completely. The goal is to prepare the crop for months of storage while keeping it whole and usable.
Onions and garlic should be cured in a dry, shaded, well-ventilated area until their outer skins are dry. After curing, they need airflow and dry storage. Well-cured pungent onions can last at least four months under good conditions, while garlic may last into late spring. Sweet onions generally store poorly and should be used sooner.
Winter squash and pumpkins can also be impressive storage crops. Butternut and Hubbard squash may keep six months or longer when properly cured, while acorn squash is generally better used within about four months. Inspect stored squash regularly and use anything showing soft spots, mold, or damage first.
Potatoes are their own category. They prefer a cool, dark, fairly humid place, not the same dry room used for onions and garlic. Store only clean, sound potatoes without cuts or disease, and check them regularly for sprouts or decay.
Smoking and Curing Meat: Useful, but Not a Shortcut
Smoking and curing are real preservation methods, but they are different from preserving a vegetable harvest.
Smoking is most commonly used with meat, fish, and poultry. Curing often involves carefully measured salt, and sometimes curing agents, to manage moisture and safety. These methods can be excellent skills for a homesteader, hunter, angler, or backyard smoker enthusiast, but they are not casual projects where you simply add smoke and expect room-temperature shelf stability.
For meat, fish, and poultry, research-based food-preservation guidance recognizes canning, freezing, drying, and curing as safe preservation methods when proper recipes and handling are used. Smoking may be part of the flavour and preservation process, but it should not replace refrigeration, freezing, or a tested curing procedure unless the recipe specifically supports shelf-stable storage.
For a garden harvest, think of smoking more as a flavour tool. Smoke-dried peppers, smoked tomatoes, or smoked salt can be useful kitchen projects, but freezing, drying, fermenting, canning, and curing crops are generally more practical ways to preserve vegetables.
Important Safety Rules That Are Not Optional
Home food preservation is worth learning, but canning safety is not a place for guesswork.
Keep these rules in mind:
- Use current, research-tested recipes for canning, pickling, and fermentation.
- Match the canning method to the acidity of the food.
- Do not reduce vinegar, lemon juice, salt, processing time, or pressure in a tested recipe.
- Do not treat a vacuum-sealed mason jar as shelf-stable canned food.
- Label and date every jar, bag, container, and batch.
- Refrigerate leftovers after opening canned food.
- Do not taste food from bulging, leaking, unsealed, badly discoloured, moldy, or suspicious jars.
Botulism is especially dangerous because contaminated food may not look, smell, or taste spoiled. Health Canada advises throwing out suspect home-canned food rather than tasting it to “check.”
Vacuum-sealing jars is useful for dry goods such as dried herbs, dehydrated vegetables, grains, or nuts. It does not replace the heat-processing step needed for shelf-stable canned food. Vacuum-sealed cooked foods, fresh vegetables, quick pickles, sauces, and similar moist foods still need refrigeration or freezing unless processed with an appropriate tested canning method.
One garden-specific warning is worth remembering: do not store fresh garlic, herbs, peppers, or vegetables in oil at room temperature. Many of these foods are low-acid and can become a botulism risk in oil unless handled with a safe tested method and proper refrigeration.
A Simple Preservation Plan for a First Serious Harvest
You do not need a wall of canning jars, a pressure canner, a chest freezer, and a dehydrator all in your first season.
A realistic beginner approach could look like this:
- Freeze your easiest surplus first: peppers, beans, corn, herbs, berries, tomatoes, and shredded zucchini.
- Make one water-bath canning project: cucumber pickles, relish, jam, or a tested tomato product.
- Dry your herbs before frost: basil, parsley, oregano, dill, mint, or thyme.
- Try one fermented vegetable project: carrots, cabbage, radishes, or cucumbers.
- Cure onions, garlic, pumpkins, and winter squash for cool storage.
- Add pressure canning later, once you have a tested guide, suitable equipment, and confidence with the process.
That is enough to turn a harvest into a system.
The Real Goal: Make the Garden Matter All Year
Growing food is satisfying. Preserving it is what makes the harvest stretch beyond the season.
A freezer bag of chopped peppers can become a winter chili. Dried basil can bring summer flavour into a January pasta sauce. A jar of pickles can turn extra cucumbers into food that lasts months. Properly cured onions, garlic, and squash can stay useful long after the first frost.
The best preservation method is not always the most traditional or impressive one. It is the one that fits the crop, your storage space, your equipment, and your ability to do it safely. Start with the easiest surplus, preserve it well, and build another skill each season. That is how a backyard garden slowly turns into a real source of year-round food.
Related External Links
- Health Canada: Home Canning Safety — Canadian guidance on safe water-bath canning, pressure canning, acidity, storage, and avoiding botulism risks.
- National Center for Home Food Preservation — Research-based guides for canning, freezing, drying, fermenting, pickling, and preserving home-grown food.