Gold Panning in Canada: Where to Look, What You Can Find, and How to Start
Canada is so large that it is easy to look at a map full of rivers, lakes, creeks, and unbroken forest and wonder how much potential is still out there. There is no realistic way that every stream in the country has been carefully panned by hand. But that does not mean every untouched-looking creek contains gold, gemstones, or valuable minerals waiting near the surface.
Gold, quartz, amethyst, agates, garnets, and other minerals occur because of specific geology. A creek may look wild, remote, and completely unexplored while carrying nothing more exciting than ordinary sand, gravel, and black mud. The fun of gold panning and rockhounding is not just chasing a jackpot; it is learning how the landscape works, reading a creek, finding interesting material, and occasionally seeing something beautiful or unusual in your pan.
For beginners, the best approach is to think of this as a practical outdoor skill and a long-term hobby. You can start with a basic pan, a small shovel, a classifier screen, and a few sample containers. You do not need heavy equipment, but you do need patience, permission, and enough common sense to avoid digging in restricted land, damaging stream banks, or wandering onto an active mining claim.
Quick Answer: Can You Still Find Gold in Canada?
Yes, people still find small amounts of placer gold in Canada, especially in historic gold regions and watersheds connected to known mineral belts. Placer gold is loose gold that has eroded out of bedrock and settled into stream gravels, cracks in bedrock, old river channels, and other natural traps. Finding a few flakes is realistic in the right place; finding enough gold to make serious money is much less likely.
The best beginner goal is not “I am going to discover an untouched fortune.” It is “I am going to learn how to recognize a promising creek, pan properly, and see what the local geology gives me.” That mindset keeps the hobby fun and stops you from wasting time chasing internet stories about secret gold rivers.
Canada has enormous mineral potential, but the most promising regions are not random. Historic placer areas, greenstone belts, gold districts, old mining camps, and known quartz-vein systems are better starting points than picking an unnamed creek on a map. The catch is that many of those places are claimed, protected, privately owned, or subject to local restrictions, so research comes before digging.
“Untouched” Does Not Always Mean Unclaimed
There are still huge areas of Canada that have seen little detailed fieldwork, especially in remote northern regions. But remote does not automatically mean open for recreational prospecting. A place can be far from roads and still be part of a mineral claim, Indigenous territory, a park, a protected area, private property, or land where mineral rights belong to someone else.
The areas most likely to have easy access and a history of gold often have plenty of people already checking them. That does not mean every good spot is “worked out,” but it does mean you should not expect to walk into a famous gold district, scoop one pan of gravel, and retire. Most visible gold found by hobbyists is small, and experienced prospectors get better results because they understand geology, sediment movement, and where heavy material settles.
A better way to think about it is this: gold may not be evenly distributed through a creek, but a creek can concentrate heavy material in certain places. Your job is to take small, legal samples and compare them. A few pans with black sand, garnet sand, or tiny bright flakes can tell you more than hiking ten kilometres through untouched bush without testing anything.
Where in Canada Are the Best Places to Start Learning?
For actual recreational gold panning, British Columbia and Yukon are often the most practical places to begin because they have long placer-gold histories, public information, and well-known recreational panning opportunities. That does not mean every creek in those regions is available, but it gives beginners a much clearer starting point than blindly choosing a river somewhere else in the country.
Ontario, Quebec, Newfoundland and Labrador, Nova Scotia, and the Northwest Territories all have important gold or mineral districts too. However, they are often better approached as geology, rockhounding, and legal land-status research projects rather than “grab a pan and start digging” destinations. Canada has world-class mineral areas, but the difference between a known gold belt and a legal hobby site matters.
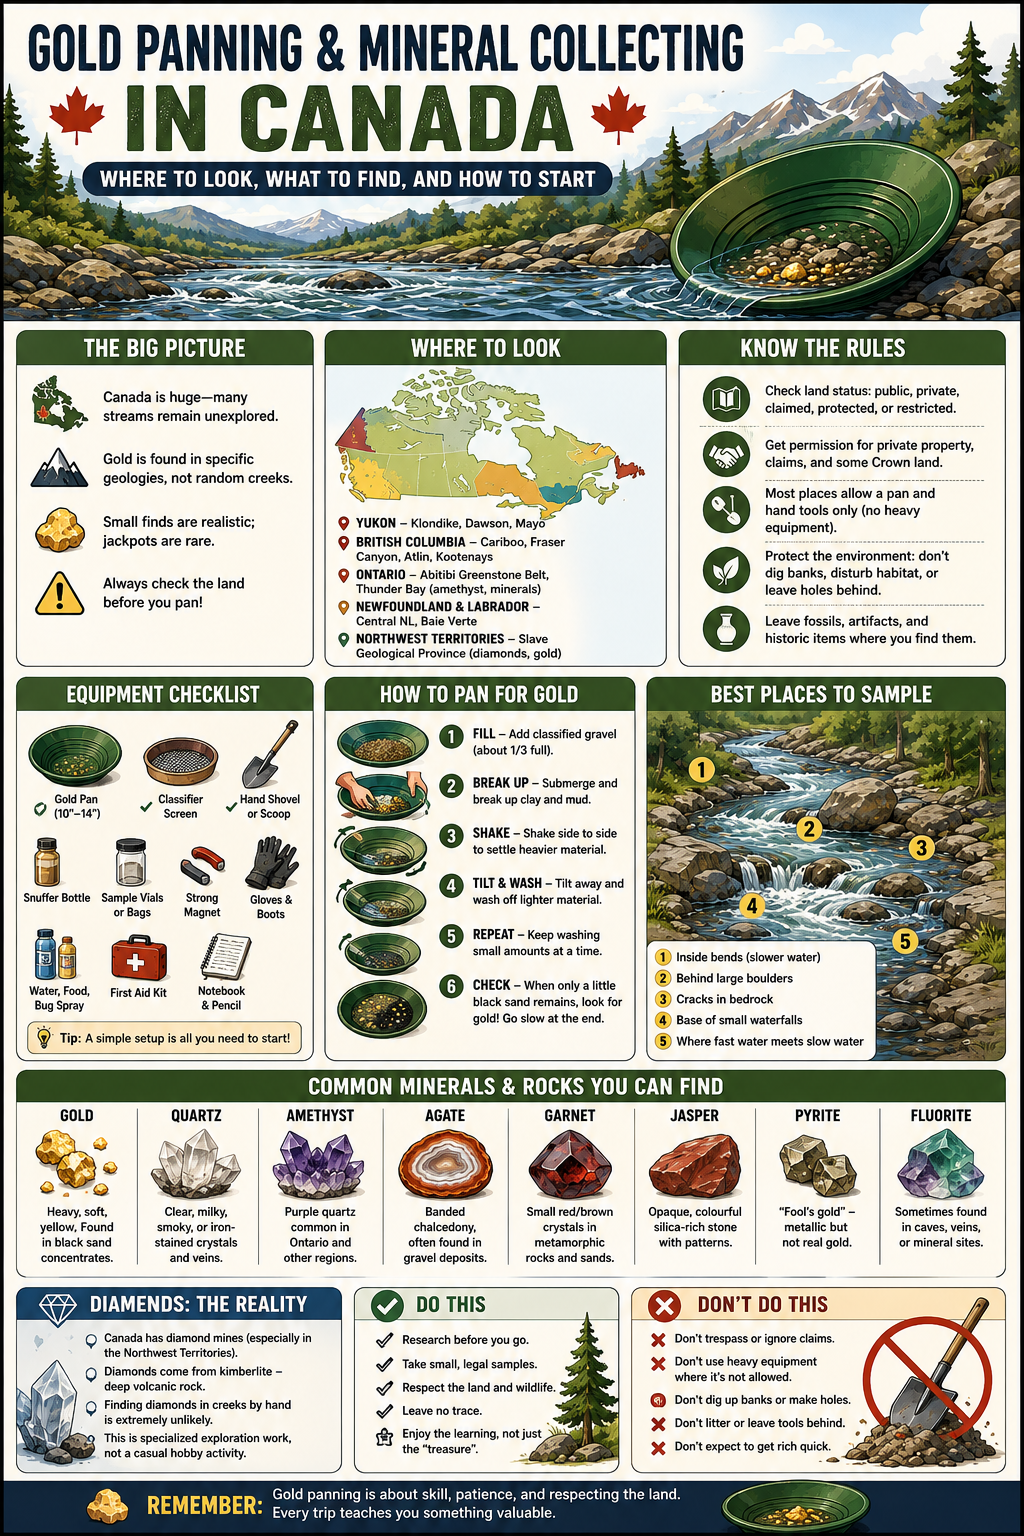
These are broad regions worth researching before you plan a trip:
- Yukon: The Klondike is the classic Canadian placer-gold region. Recreational panning can be available, but independent panning requires checking land status and following Yukon’s rules.
- British Columbia: The Cariboo, Fraser River country, Atlin area, and parts of the Kootenays have deep placer-gold history. B.C. also maintains recreational panning reserves where low-impact hand panning is allowed.
- Northern Ontario and western Quebec: The Abitibi greenstone belt is famous for hard-rock gold mining. It is excellent country for learning geology, but you must take land access, claims, and permissions seriously.
- Newfoundland and Labrador: Central Newfoundland and the Baie Verte region have significant gold occurrences and active exploration history. This is more of a serious geology-and-mapping area than an easy “pan every creek” region.
- Northwest Territories: The Slave Geological Province is famous for diamonds, gold, base metals, and rare-earth potential. It is spectacular mineral country, but it is remote, regulated, and not a casual beginner-diamond-hunting destination.
Gold Panning Is Not the Same as Mining
Gold panning is the simplest version of placer prospecting. You are taking a small amount of gravel, washing away lighter material, and looking at what remains. You are not excavating large holes, running a sluice box, using a dredge, stripping a bank, or moving enough material to change the creek.
Mining is a completely different level of activity. It usually involves claims, permits, land-use rules, environmental requirements, machinery, fuel, water management, and serious costs. Even a small sluice box may be restricted in some provinces or territories, which is why a beginner should start with a pan, hand shovel, and low-impact sampling habits.
That distinction protects both you and the place you are visiting. A shallow test pan can be a respectful way to learn about a creek. Digging into banks, diverting water, or disturbing the streambed can create erosion, damage fish habitat, and get you into trouble fast.
Check the Land Before You Collect Anything
The biggest beginner mistake is assuming that Crown land means open land. It does not. Mineral rights, surface rights, Indigenous rights, protected-area rules, active claims, and private ownership can overlap in ways that are not obvious from a trailhead or satellite map.
Before you pan, collect rocks, chip quartz, or take home a crystal, confirm who controls the land and whether hobby collection is allowed. Provincial mining map systems, land-status maps, municipal resources, and local mining recorder offices are far more useful than guessing. When in doubt, ask before you go.
A responsible pre-trip check should include:
- Confirm whether the land is public, private, claimed, leased, protected, or restricted.
- Check whether a provincial park, conservation area, heritage site, reserve, or ecological protection rule applies.
- Get permission before entering private property, active claims, quarries, mines, or commercial rock sites.
- Confirm what equipment is allowed; a pan and hand shovel may be permitted where sluices, dredges, detectors, or pumps are not.
- Avoid digging banks, undercutting roots, disturbing spawning areas, or leaving holes behind.
- Leave fossils, bones, cultural objects, old tools, and historic artifacts where you find them.
What You Need for Beginner Gold Panning
A beginner kit does not need to be complicated. The main tool is a plastic gold pan with riffles, which are the small raised grooves that help trap heavy material while lighter sand washes away. A dark green, blue, or black pan makes it easier to see pale gold flakes against the bottom.
You will also want a small hand shovel, a classifier screen, a snuffer bottle, and tiny vials for anything interesting you find. A classifier screen sits over the pan or bucket and removes larger stones, roots, and chunks of gravel, which makes the panning process faster. Gloves, waterproof boots, eye protection, a magnet, and a notebook are also more useful than beginners expect.
A practical beginner setup usually includes:
- One 10- to 14-inch plastic gold pan.
- Small classifier screen.
- Hand shovel or scoop.
- Snuffer bottle for picking up fine gold.
- Small plastic vials or labelled sample bags.
- Strong magnet for checking black sands.
- Gloves, boots, drinking water, bug spray, and a first-aid kit.
Check out Beginner gold-panning kits on Amazon Canada (This is NOT an affiliate link). A basic pan or starter kit is usually enough for learning, and you do not need a giant kit full of equipment you may not legally be able to use in your province.
How to Pan for Gold Step by Step
The first few times you pan, it can feel like you are simply washing gravel in circles. That is normal. Good panning is mostly about keeping the heavy material low in the pan while slowly washing lighter sand, mud, and small gravel away.
Start with a small amount of classified material rather than filling the pan to the top. If you overfill it, you cannot see what is happening and you will probably wash away material too aggressively. A smaller sample lets you practice the movement and notice patterns in the sand.
Use this simple process:
- Fill the pan about one-third full with classified gravel and sand.
- Submerge it in water and break up clay, mud, and compacted material with your fingers.
- Shake the pan side to side and slightly forward and back to help heavy material settle to the bottom.
- Tilt the pan slightly away from you and gently wash off a little lighter material at a time.
- Repeat the shake-and-wash process until only a small amount of black sand and heavy material remains.
- Keep the pan low and slow near the end; fine gold can be lost when you rush.
- Look for bright yellow metal that stays in the pan instead of floating, washing away, or breaking apart.
Real gold is heavy, soft, and consistently yellow. Mica can flash brightly but tends to flutter and move easily. Pyrite, often called fool’s gold, may look metallic but is usually more brassy, angular, and brittle than actual gold. Do not expect every yellow speck to be gold; learning to tell the difference is part of the hobby.
Where to Sample in a Creek
Gold moves with water, but because it is heavy, it tends to settle where the water slows down or where the streambed gives it a place to hide. You are not looking for a magical “gold spot.” You are looking for natural traps that can collect heavy material over time.
Good beginner sample areas include the inside bends of a creek, behind large boulders, in cracks in exposed bedrock, at the base of small waterfalls, and where a faster side channel meets slower water. Black sand can be worth checking because it often contains other heavy minerals, although black sand alone does not prove gold is present.
Avoid digging straight down in the middle of a fast creek or tearing into the banks. In many places, the best material may be sitting in a thin layer near bedrock, but reaching that layer safely and legally is not always possible. Treat each site as a small sample test, not a major excavation project.
Other Rocks and Minerals You May Find by Hand
Gold is exciting, but many beginners discover that rockhounding becomes just as addictive. Canada has plenty of interesting minerals that can be found in loose rock, gravel, old road cuts, permitted quarries, shorelines, and mineral-rich regions. The important thing is to collect responsibly and avoid treating every pretty rock as valuable.
Some of the most realistic finds for hobbyists include:
- Quartz: Clear, white, smoky, milky, or iron-stained crystals and veins.
- Amethyst: Purple quartz, especially associated with the Thunder Bay region of Ontario.
- Agate: Banded or translucent chalcedony, often found along shorelines and gravel deposits.
- Jasper: Opaque red, yellow, brown, or green silica-rich stone with strong patterns.
- Garnet: Small red or brown crystals often found in metamorphic rock and heavy sand.
- Calcite and fluorite: Sometimes found in crystal form, but often connected to private quarries or known mineral sites.
- Pyrite: Metallic gold-coloured crystals that are fun to collect even though they are not actual gold.
The “ordinary-looking rock with colourful crystals inside” that people imagine is often a geode, crystal pocket, amethyst-lined cavity, or quartz-filled fracture. In Canada, purple crystal material is often amethyst rather than a classic hollow geode. Do not smash random rocks on public land hoping for treasure; you can damage an interesting specimen, create litter, or break rules on collecting in that area.
What About Diamonds?
Canada absolutely has major diamond deposits, especially in the Northwest Territories. The famous diamond mines in that region are connected to kimberlite, a volcanic rock that brought diamonds from deep in the Earth toward the surface. That makes for a great story, but it does not mean diamonds are realistically waiting in ordinary creek gravel for casual hikers.
Diamonds are rare, and diamond exploration is highly specialized. Geologists often search for tiny “indicator minerals” that can point toward kimberlite before anyone spends serious money drilling or sampling a potential deposit. Even when kimberlite is found, very few kimberlite bodies contain enough diamonds to become economic mines.
For a beginner, diamonds are better treated as an interesting piece of Canadian geology than a realistic hand-prospecting target. You are far more likely to find quartz, garnet, agate, amethyst, mica, pyrite, or interesting black sands than a diamond. That is not disappointing; those finds are part of learning how mineral-rich landscapes actually work.
How Deep Do You Need to Dig?
For basic recreational panning, you should not be digging deep at all. Most beginner sampling happens in loose surface gravel, shallow material behind boulders, crevices in exposed bedrock, or small layers of compacted sand and gravel close to the waterline. If finding a sample requires digging a serious hole, cutting into a bank, or moving large boulders, it is no longer a casual hobby activity.
The deeper gold deposits people hear about in mining stories are usually buried in old channels, bedrock veins, glacial material, or underground ore systems. Reaching those deposits takes claims, equipment, geological knowledge, and environmental approvals. A hand pan is for learning what is in a small sample, not for reaching the kind of deposits commercial mines spend millions of dollars exploring.
This is actually good news for beginners. You can learn a huge amount by taking ten legal, shallow samples from different parts of one creek and comparing what settles in the bottom of each pan. That kind of careful observation teaches more than randomly digging one deep hole ever will.
Final Thoughts
Gold panning in Canada can be a fantastic bushcraft-style hobby because it gets you outside, teaches you how to read water and terrain, and gives you a reason to learn real geology. It can also become an expensive fantasy if you treat every quiet creek as a hidden gold mine. Keep your expectations realistic, your equipment simple, and your research serious.
The best first goal is to find a legal place, learn the panning motion, and see what your local gravel actually contains. Maybe you find black sand, garnet, quartz, mica, or a few tiny flakes of placer gold. Maybe you go home with nothing but muddy boots and better questions for the next trip.
That is still a win. The people who get the most out of prospecting are not the ones chasing internet treasure stories. They are the ones who keep learning, respect the land, and gradually get better at spotting what the landscape is trying to tell them.
- British Columbia: Recreational Hand Panning — Explains B.C.’s recreational panning reserves, permitted hand tools, and places where panning is prohibited.
- Ontario: Hobby Mineral Collecting Policy — Helps Ontario rockhounds understand land status, access rights, and when permission is required before collecting samples.
I remember the gift shops at museums as a kid I always loved and wanted to buy all those cool gems and jewels. Maybe another article for finklecraft could be how to spot geodes and other rocky finds and what signs to look for in an area that would give hope of a promising hunt. Just a suggestion 🙂