
How to Pickle Beets Safely: The Complete Beginner’s Guide
A basket of freshly harvested beets can feel like a small homesteading victory—right up until you realize that several pounds of them need to be eaten before they soften, shrivel, or disappear into the back of the refrigerator. Pickling solves that problem while transforming a muddy-looking root vegetable into something bright, tangy, sweet, and surprisingly addictive. A properly canned jar of pickled beets can sit on a pantry shelf for months, ready to be opened beside a winter meal when the garden is buried under snow.
At first glance, the process appears almost too simple. Cook the beets, cover them with vinegar, put on a lid, and wait for the familiar pop. Unfortunately, that shortcut leaves out the most important part: a sealed lid does not automatically mean the food inside was safely preserved.
Beets are naturally low-acid vegetables, which means plain beets require pressure canning. Pickled beets are different because a tested quantity of vinegar raises their acidity enough to allow them to be processed in a boiling-water canner. The proportions, jar size, headspace, and processing time all work together, so this is one recipe where improvisation should be saved for the seasoning—not the preservation method.
The good news is that pickling beets is not difficult. Most of the work involves boiling, peeling, and slicing them. Once the equipment is organized and the safety rules are understood, the actual canning process is straightforward enough for a complete beginner.
What Are Pickled Beets?
Pickled beets are cooked beets preserved in an acidic brine usually made from vinegar, water, sugar, salt, and spices. They have a distinctive balance of earthy beet flavour, sharp vinegar, sweetness, and warm spice. Depending on the recipe, they may be sliced, quartered, cubed, or left whole when using small baby beets.
There are two main ways to make them. Refrigerator pickled beets are covered with brine and stored in the refrigerator for short-term use. Shelf-stable pickled beets are packed into proper canning jars and processed in a boiling-water canner for a tested amount of time.
The refrigerator method is convenient when dealing with only a few beets. However, anyone preserving a larger garden harvest will probably appreciate the shelf-stable method because the jars do not consume refrigerator or freezer space. This guide focuses on the shelf-stable version while also explaining how it differs from a simple refrigerator pickle.
Why Pickling Works
Pickling is not simply a flavouring technique. It is a preservation system based on controlling acidity, microorganisms, temperature, and the environment inside the jar. Most fresh vegetables, including beets, are low-acid foods, while properly prepared pickles are considered high-acid foods suitable for boiling-water processing.
The vinegar lowers the pH of the finished product, creating conditions in which dangerous botulism-causing bacteria cannot grow. The boiling-water process then destroys many spoilage organisms, heats the food throughout, vents air from the jars, and helps create a vacuum seal as the jars cool. Processing also reduces the risk of spoilage caused by yeasts, moulds, and enzymes that can affect texture, flavour, and colour.
Sugar mainly balances the sharpness of the vinegar and complements the natural sweetness of the beets. Salt improves flavour, while spices provide the familiar warming notes associated with old-fashioned pickled beets. None of those ingredients should be assumed to replace the preservative role of the vinegar and heat-processing steps.
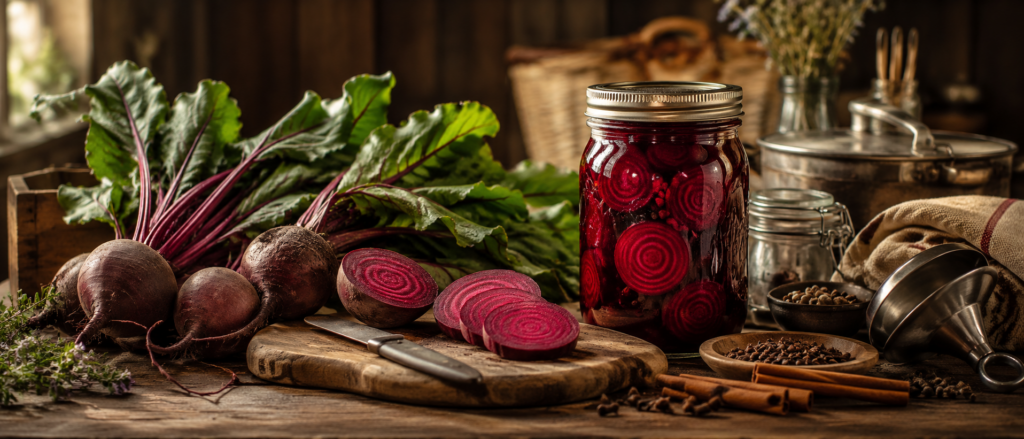
Why People Still Pickle Beets
Modern refrigeration has made food preservation less urgent than it once was, but pickling remains useful. A heavy beet harvest often arrives within a short period, and even a productive household can only eat so many roasted or boiled beets at once. Turning them into shelf-stable jars spreads that harvest across the rest of the year.
There is also a self-reliant satisfaction in converting garden produce into food that does not depend on freezer space or continuous electricity. A shelf filled with home-canned vegetables is not merely decorative nostalgia. It represents meals already prepared, food waste prevented, and another household skill that becomes easier with repetition.
Pickled beets also offer something plain canned beets do not: they are ready to eat directly from the jar. They can be added to salads, sandwiches, grain bowls, charcuterie boards, or served as a side dish without further cooking. Their acidity makes them particularly useful beside rich, salty, or fatty foods.
Refrigerator Pickles Versus Shelf-Stable Pickled Beets
Refrigerator pickled beets are the easier option. You cook and peel the beets, place them in a clean container, pour over an appropriate brine, cool them, and refrigerate them. Because they are not processed in a canner, they must remain refrigerated and should never be treated as pantry-stable food.
Shelf-stable pickled beets require one additional stage. After the hot beets and brine are packed into proper Mason jars, the jars are processed in a boiling-water canner. This heat-processing step is what turns a jar of refrigerated pickles into a properly canned pantry product.
The important distinction is not whether the lid pops. Hot food placed inside a jar may produce a vacuum as it cools, even when the jar has not been correctly processed. A tight lid tells you that a vacuum formed; it does not prove that the contents were safely acidified and heated.
What You Need to Get Started
You do not need an elaborate commercial kitchen, but having the correct tools will make the process safer and far less frustrating. A dedicated water-bath canner is useful, although a deep stockpot can work if it has a fitted lid, a rack beneath the jars, and enough depth to keep the jars covered with at least one inch of boiling water. The jars should never sit directly against the bottom of the pot.
Essential Canning Equipment
- Eight 500 mL or pint-sized Mason jars
- Eight new flat canning lids
- Eight reusable screw bands in good condition
- Boiling-water canner or deep stockpot with a lid
- Canning rack that fits inside the pot
- Jar lifter
- Wide-mouth canning funnel
- Non-metallic bubble remover or spatula
- Large stainless-steel saucepan
- Large pot for cooking the beets
- Ladle, knife, cutting board, timer, and clean towels
- Cheesecloth or reusable spice bag
Use jars specifically designed for home canning rather than ordinary commercial pasta sauce or mayonnaise jars. Inspect every jar for cracks, chips, and damaged rims. Flat sealing lids should be new for every batch, although undamaged screw bands can be reused.
Health Canada recommends using proper canning jars, new self-sealing lids, current tested recipes, the stated jar size, and the precise processing instructions. Substituting jar sizes or ingredient amounts can change how heat moves through the food.
Tested Pickled Beet Ingredients
The following recipe is based on the tested National Center for Home Food Preservation formula. It produces approximately eight pint or 500 mL jars, although the actual yield can vary slightly according to beet size and how tightly the pieces are packed.
Ingredients
- 7 pounds or approximately 3.2 kilograms of beets
- 4 cups commercially produced vinegar labelled 5% acidity
- 2 cups water
- 2 cups white sugar
- 1½ teaspoons canning or pickling salt
- 2 cinnamon sticks
- 12 whole cloves
- 4 to 6 small onions, optional
You may use white distilled vinegar or cider vinegar if it is commercially produced and labelled 5% acidity. White vinegar gives the beets a brighter, sharper flavour, while cider vinegar creates a slightly softer and fruitier result. Never use homemade vinegar or vinegar of unknown acidity for shelf-stable canning.
Canning salt is preferred because it dissolves cleanly and does not contain additives that may cloud the brine. The onions are optional and may be omitted. Small baby beets approximately one to one-and-a-half inches in diameter may also be packed whole rather than sliced.
The following image group should appear early in the article to show the main stages a beginner will encounter. The images should clearly demonstrate preparation, correct jar filling, and proper water-bath processing rather than simply showing decorative finished jars.
Step 1: Harvest and Select Your Beets
Choose fresh, firm beets without widespread rot, mould, or deep damage. Beets between two and three inches across are particularly convenient because they cook evenly and usually have a pleasant texture. Larger beets may still be used, although very old or oversized roots can occasionally become woody.
Cut off most of the leafy tops but leave approximately one inch of stem attached. Leave the long taproot attached as well. Keeping both ends largely intact during cooking helps prevent the deep red colour from bleeding excessively into the cooking water.
Wash the beets thoroughly under cool running water to remove soil. Do not peel them before cooking. Beet skins become much easier to remove after the roots have been simmered.
The beet greens do not need to be thrown away. Healthy young leaves can be cooked similarly to Swiss chard, while damaged leaves and trimmings can be composted. This allows nearly the entire harvested plant to be put to practical use.
Step 2: Prepare the Canner, Jars, and Work Area
Place the canning rack in the bottom of your canner and begin heating the water. You will eventually need enough water to cover the filled jars by at least one inch. Starting early prevents you from standing around later waiting for a large pot of water to heat.
Wash the jars, lids, and screw bands in hot soapy water and rinse them thoroughly. Keep the jars hot until they are ready to be filled. Hot jars are less likely to crack when hot beets and boiling brine are added.
Bernardin currently advises washing its modern sealing lids in hot soapy water and leaving them at room temperature rather than simmering them. Lid instructions can vary by manufacturer, so follow the directions included with the lids you purchase.
Arrange your funnel, ladle, jar lifter, bubble remover, clean cloth, and timer beside the stove. Once the beets and brine are hot, the process moves quickly. Canning is considerably easier when you are not searching through drawers for a missing tool with a pot boiling on the stove.
Step 3: Cook the Beets
Sort the beets into groups of similar size so they cook at approximately the same rate. Place them in a large pot, cover them with boiling water, and cook them until tender. The tested National Center recipe estimates approximately 25 to 30 minutes, although very large roots can require longer.
Test them with a fork or thin knife. The utensil should enter the beet without requiring excessive force, but the beet should not be collapsing or falling apart. Remember that the pieces will receive additional heat in the brine and canner.
Drain the cooked beets and discard the cooking liquid. Allow the roots to cool only until they can be handled safely. Trim away the remaining stems and taproots, then slip off the loosened skins with your fingers or a paper towel.
Beet juice stains hands, clothing, wooden boards, and porous countertops. An apron, washable cutting board, dark towel, and pair of food-safe gloves can make cleanup much easier. This is not essential to the recipe, but your kitchen may look considerably less dramatic afterward.
Step 4: Slice the Beets and Optional Onions
Slice the peeled beets into pieces approximately one-quarter inch thick. Uniform slices heat consistently and are easy to pack into jars. If you are using small baby beets, they may be left whole according to the tested variation.
Peel and thinly slice the optional onions. The onions add a savoury note that works well against the sweetness and vinegar. Leaving them out does not change the basic pickling procedure.
Keep the prepared beets warm while the brine is made. The goal is to place hot food and hot liquid into hot jars before transferring them into the hot canner. Avoid preparing the beets several hours in advance and allowing them to become completely cold.
Step 5: Prepare the Pickling Brine
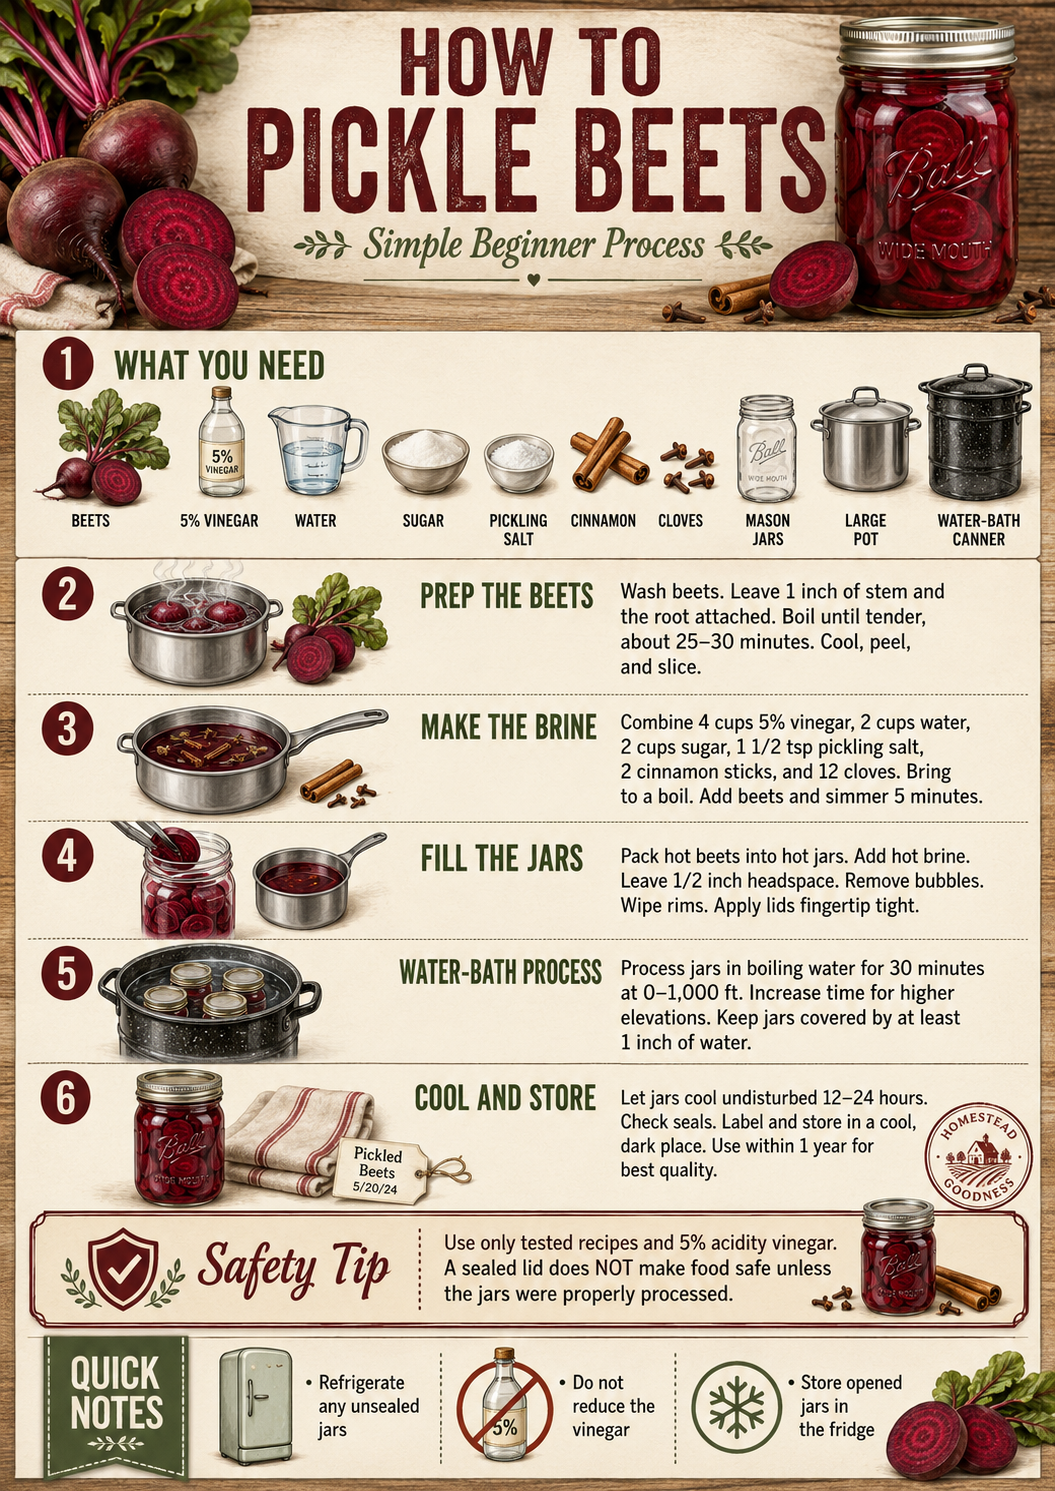
Combine four cups of 5% vinegar, two cups of water, two cups of sugar, and 1½ teaspoons of canning salt in a large stainless-steel saucepan. Tie the cinnamon sticks and whole cloves inside a piece of cheesecloth or place them in a reusable spice bag. Add the spice bag to the liquid.
Bring the mixture to a boil while stirring until the sugar is dissolved. Add the sliced beets and optional onions, return the mixture to a boil, and simmer it for five minutes. Remove and discard the spice bag when the simmering period is complete.
Use stainless steel, enamelled cookware, or another non-reactive pot. Strong vinegar can react with bare aluminium, copper, or certain other metals and may affect the flavour or colour of the finished food.
Do not dilute the brine because it smells or tastes strongly acidic while boiling. The recipe is designed around the final acidity after the beets and liquid are combined. Reducing the vinegar or increasing the water can make the product unsuitable for boiling-water canning.
Step 6: Fill the Jars
Remove one hot jar from the water and place it on a towel or heat-resistant surface. Use the canning funnel to pack the hot beets and onions into the jar. Ladle in the hot pickling liquid, leaving one-half inch of headspace between the brine and the top rim of the jar.
Slide a non-metallic bubble remover down the inside of the jar in several places to release trapped air. Check the headspace again because escaping bubbles may cause the liquid level to drop. Add more hot brine if necessary while maintaining the required half-inch space.
Wipe the rim with a clean damp cloth to remove beet pieces, sugar, or spices. Centre a new flat lid on the clean rim, add the screw band, and tighten it until fingertip tight. The band should be secure without being forcibly cranked down.
Excessively tight bands can prevent air from venting properly during processing. The band merely holds the lid in place. The actual seal develops as air escapes during heating and a vacuum forms while the jar cools.
Step 7: Process the Jars in a Boiling-Water Canner
Place each filled jar upright on the canning rack. Ensure that the jars are covered with at least one inch of water. Cover the canner and bring the water to a full rolling boil.
Do not start the timer while the water is merely steaming, simmering, or producing occasional bubbles. Processing time begins only when the filled canner has returned to a vigorous rolling boil. For elevations up to 1,000 feet or 305 metres, process pint, 500 mL, or quart jars of this tested pickled beet recipe for 30 minutes.
The National Center for Home Food Preservation lists the following elevation adjustments:
- 0 to 1,000 feet: 30 minutes
- 1,001 to 3,000 feet: 35 minutes
- 3,001 to 6,000 feet: 40 minutes
- Above 6,000 feet: 45 minutes
Elevation matters because water boils at a lower temperature as altitude increases. The longer processing times compensate for that lower boiling temperature. Anyone uncertain of their local elevation should check it rather than guessing.
Keep the water boiling for the entire processing period. If it stops boiling, bring it back to a vigorous boil and restart the complete processing time. Add additional boiling water around the jars if evaporation causes the water level to fall, but avoid pouring directly onto the lids.
Step 8: Remove and Cool the Jars
When the processing time is complete, turn off the heat and remove the canner lid, tilting it away from your face. Allow the jars to remain in the canner for five minutes. This short rest reduces sudden temperature changes and may help prevent liquid from being forced out of the jars.
Use a jar lifter to remove each jar without tilting it. Place the jars upright on a towel, wooden board, or cooling rack, leaving some space between them. Allow them to cool undisturbed for 12 to 24 hours.
Do not press the lids while they are cooling, even if you are eager to test them. Do not retighten the screw bands, place hot jars in cold water, or move them into the refrigerator. The vacuum seal needs time to develop naturally. Bernardin advises cooling the jars upright and undisturbed for 24 hours.
You may hear several satisfying pops as the jars cool. That sound is encouraging, but every seal should still be checked manually after the cooling period. A quiet jar may seal properly, while a jar that makes a noise is not automatically guaranteed to have sealed.
Step 9: Check the Seals
After the jars have cooled, remove the screw bands and press the centre of each lid. A properly sealed lid should curve slightly downward and should not move, flex, or click when pressed. You may also gently lift the jar by the edge of the flat lid while keeping your other hand close beneath it, although pressing the centre is usually sufficient.
A jar that failed to seal should not be placed in pantry storage. Refrigerate it and use it promptly, or follow a current tested reprocessing procedure using a new lid. Do not attempt to force the lid downward or hold it in place with the screw band.
Wipe the sealed jars clean and label each one with the contents and processing date. Store the jars without tightly attached screw bands. Removing the bands prevents trapped moisture from encouraging rust and makes it easier to notice a lid that has lost its seal.
How to Store Pickled Beets
Store properly processed jars in a cool, dry, dark location away from direct sunlight and heat sources. Health Canada and Bernardin recommend using home-canned foods within one year for the best quality. Once a jar has been opened, it must be refrigerated.
Inspect each jar before opening it. Do not eat food from a jar with a bulging lid, leaking liquid, broken seal, unusual spurting, visible mould, or other signs of spoilage. Never taste suspicious food to determine whether it is safe.
Botulism contamination does not necessarily change a food’s colour, smell, or taste. Health Canada’s rule is direct and worth remembering: when in doubt, throw it out.
Can You Reduce the Sugar?
The standard tested recipe creates a traditionally sweet pickle, and two cups of sugar may look excessive to someone who prefers sharper beets. However, the safest approach is not to redesign a tested shelf-stable recipe at home. Instead, locate a separate tested reduced-sugar or no-sugar-added pickled beet recipe from a reliable canning authority.
Sugar is not the main source of acidity in this recipe, but it affects flavour, texture, and the balance of the finished product. Large changes may produce disappointing results even when the acid ratio remains untouched. Using an entirely separate tested recipe removes the uncertainty.
You can always drain or lightly rinse a serving after opening if you find the finished beets sweeter than expected. That allows you to adjust the flavour at the table without changing the tested preservation formula inside the jar.
Safe Customization Versus Risky Experimentation
There is still room to personalize pickled beets. You may choose between white and cider vinegar when both are commercially produced at the required acidity. You may omit the optional onions, use whole baby beets as directed, or select another tested pickled beet recipe featuring a different approved spice blend.
Dry spices are usually the most sensible place to vary the flavour while keeping the tested proportions intact. Cinnamon, cloves, peppercorns, mustard seed, or commercial pickling spice can create noticeably different jars. Keep additions reasonable because spice flavour often becomes stronger during storage.
Avoid making the following untested changes:
- Reducing the required amount of vinegar
- Increasing the amount of water
- Using vinegar with unknown or inadequate acidity
- Adding large quantities of fresh garlic, peppers, or other vegetables
- Thickening the brine with flour, starch, or vegetable puree
- Using jars larger than the tested recipe allows
- Skipping the boiling-water process
- Using oven canning or open-kettle canning instead
- Treating a vacuum jar sealer as a substitute for heat processing
Health Canada advises against changing ingredient amounts, jar size, processing time, or pressure requirements in tested home-canning recipes. Substitutions can affect how the food heats and may allow dangerous bacteria to remain in the finished product.
Common Beginner Mistakes
The most common mistake is believing that a popped lid proves the food is safe. A lid may seal after hot food is poured into a jar, but shelf stability depends on the acidity and complete heat-processing method. A vacuum is only one part of safe canning.
Another mistake is beginning the processing timer too early. The clock starts when the canner reaches a full rolling boil after all the filled jars are inside. Timing from the moment the jars enter hot water can shorten the actual treatment considerably.
Some beginners also overcook the beets before packing them. Remember that they will simmer in brine and spend another 30 minutes in boiling water. Cook them until tender enough to peel, but not until they are collapsing.
Finally, people sometimes underestimate how much organization matters. Prepare the tools, warm the jars, heat the canner, and measure the ingredients before the beets are ready. A calm and orderly canning session is less likely to produce forgotten steps, cracked jars, incorrect headspace, or rapidly cooling ingredients.
Why Tested Recipes Deserve More Trust Than Family Folklore
Almost every canning discussion eventually includes a variation of, “My grandmother did it this way for 50 years and nobody got sick.” That experience deserves respect, but it does not prove that every jar produced by the method was correctly acidified or processed. Many unsafe practices do not cause illness every time they are used.
Modern tested recipes are developed to account for acidity, jar size, food density, piece size, heat penetration, and processing time. Those factors are difficult to judge by appearance alone. The method may seem fussy until you consider that the jars will sit without refrigeration for months.
A skeptical homesteader should question unnecessary gadgets, trendy shortcuts, and marketing claims. However, tested food-safety procedures are not pointless bureaucracy. They are the part of traditional food preservation that allows an old skill to be practised with much greater confidence.
How to Serve Pickled Beets
Pickled beets are excellent directly from the jar, but they are more versatile than many people realize. Their combination of sweetness and acidity works particularly well with rich cheese, roasted meat, eggs, potatoes, nuts, and peppery greens. They also add dramatic colour to otherwise plain meals.
Try them in sandwiches, chopped salads, grain bowls, potato salad, or beside grilled sausages. They pair especially well with goat cheese, feta, walnuts, dill, hard-boiled eggs, and arugula. Chopped pickled beets can also be mixed into a relish for burgers or served on a winter charcuterie board.
The refrigerated brine from an opened jar can be added sparingly to salad dressing. Expect it to stain nearly everything bright pink, including onions, eggs, countertops, and possibly your favourite wooden spoon. That may be either a warning or a selling point.
Why Pickling Beets Matters Today
Food preservation is sometimes presented as a hobby from another era, but the practical benefits remain current. Garden harvests still arrive faster than most households can eat them. Grocery prices fluctuate, freezers have limited space, and power outages remain inconvenient.
Canning does not make a household completely independent, but it adds resilience. It reduces waste, extends the value of garden work, and produces convenient food from ingredients that may otherwise spoil. Those small capabilities are the foundation of meaningful self-reliance.
The first batch may feel slow because every step is unfamiliar. The second batch becomes more natural, and eventually the process turns into an ordinary seasonal routine. That is how useful skills are built—not through one dramatic survival project, but through repeated household work that produces something tangible.
Final Verdict: Is Pickling Beets Worth It?
Pickling beets is simple, but it should not be careless. The peeling and slicing require patience, while the canning stage demands accurate measurements and attention to timing. None of the individual steps are especially difficult.
For a large garden harvest, the tested boiling-water method is probably the best balance of flavour, storage life, simplicity, and equipment cost. It requires common ingredients, ordinary Mason jars, and no pressure canner. The critical details are commercially produced vinegar of the stated acidity, the tested vinegar-to-water ratio, half-inch headspace, correct processing time, and verified seals.
Follow those rules and the remaining choices become enjoyable ones: sliced or whole, white or cider vinegar, onions or no onions, and which spices taste best in your household. A few hours of work can turn a pile of fresh roots into colourful jars that remain useful long after the garden has stopped producing.
That is the real appeal of pickling beets. It is not merely a recipe. It is a small, practical system for turning seasonal abundance into dependable food.
National Center for Home Food Preservation – Tested Pickled Beet Recipe:
https://nchfp.uga.edu/how/pickle/vegetable-pickles/pickled-beets/
Health Canada – Home Canning Safety:
https://www.canada.ca/en/health-canada/services/general-food-safety-tips/home-canning-safety.html
The beets from my garden are huge, probably should have picked them sooner but I will be using a pressure cooker since I have one available to me. I’m hoping everything goes smoothly but I have a feeling I will be staining much of my kitchen purple. As long as the beets are tasty and preserved I’m okay with that 😂